Spring Boot
- jdk1.8
- maven 3.6.1
- springboot:最新版
- IDEA最新
思维导图
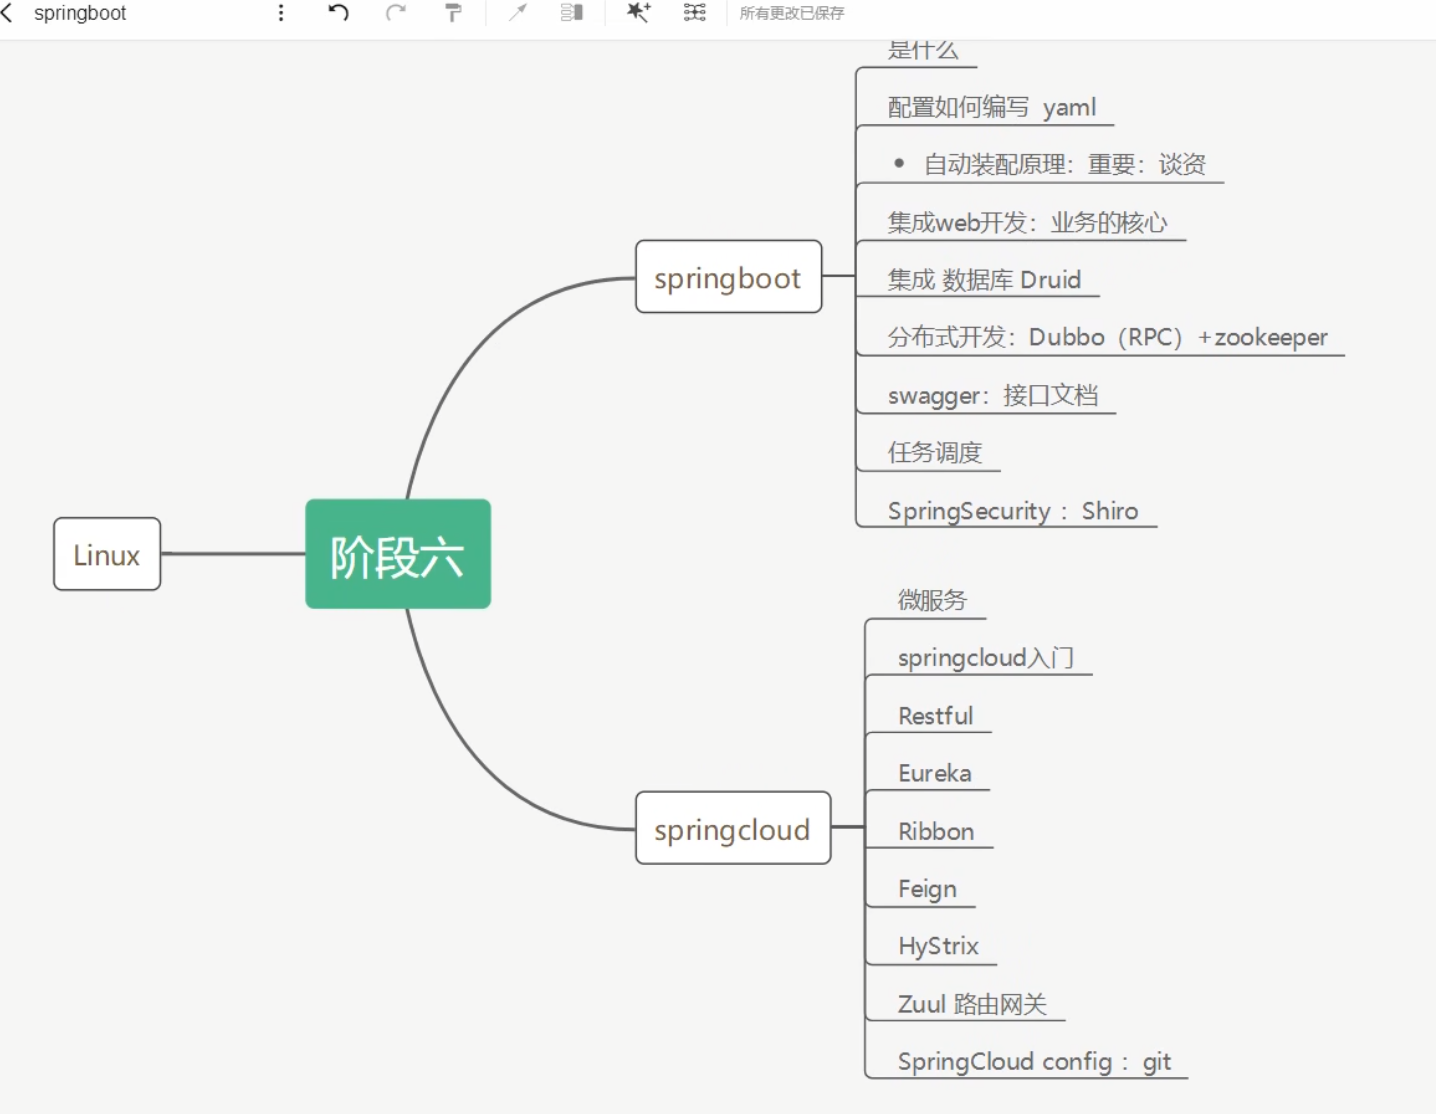
介绍
spring是什么
轻量级的Java 开发框架
Spring是为了解决企业级应用开发的复杂性而创建的,,简化开发
spring如何简化
为了降低Java开发的复杂性,Spring采用了以下4种关键策略
1、基于POJO的轻量级和最小侵入性编程;
2、通过IOC容器,依赖注入(DI)和面向接口实现松耦合
3、基于切面(AOP)和惯例进行声明式编程;
4、通过切面和模版减少样式代码Java企业级应用->J2EE->spring->springboot的过程
约定大于配置
Spirng Boot 本身并不提供 Spring 框架的核心特性以及扩展功能,只是用于快速、敏捷地开发新一代基于 Spring 框架的应用程序。
并不是用来替代 Spring 的解决方案,而是和 Spring 框架紧密结合用于提升 Spring 开发者体验的工具
Spring Boot 以约定大于配置的核心思想,默认帮我们进行了很多设置,多数 Spring Boot 应用只需要很少的 Spring 配置
同时它集成了大量常用的第三方库配置(例如 Redis、MongoDB、Jpa、RabbitMQ、Quartz 等等),Spring Boot 应用中这些第三方库几乎可以零配置的开箱即用
默认配置了很多框架的使用方式,就像maven整合了所有的jar包
Spring Boot的主要优点:
- 为所有Spring开发者更快的入门
- 开箱即用,提供各种默认配置来简化项目配置
- 内嵌式容器简化Web项目
- 没有冗余代码生成和XML配置的要求
程序=数据结构+算法I(集合框架); 程序猿
程序=面向对象+框架; 码农
微服务
也是一种架构
业务service:userService:===>模块!(将业务服务拆分成模块)
springmvc,controller ==>提供接口!
架构
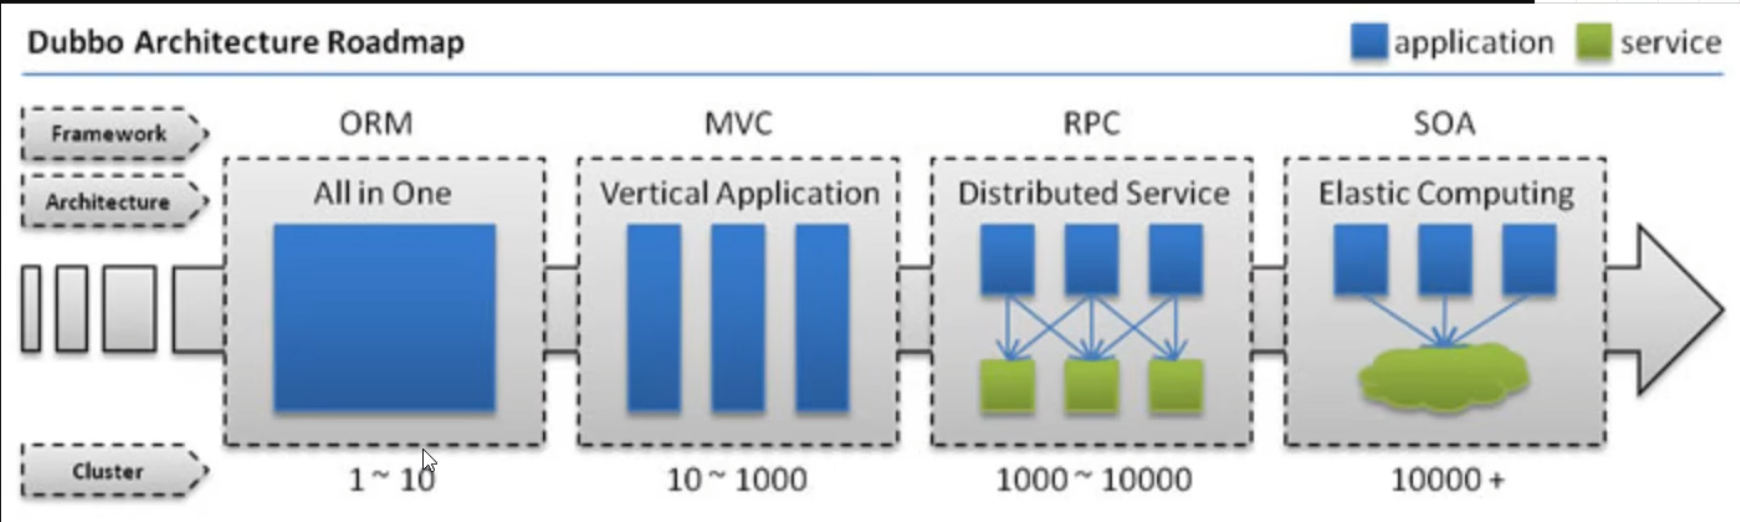
单体应用架构(al in one)
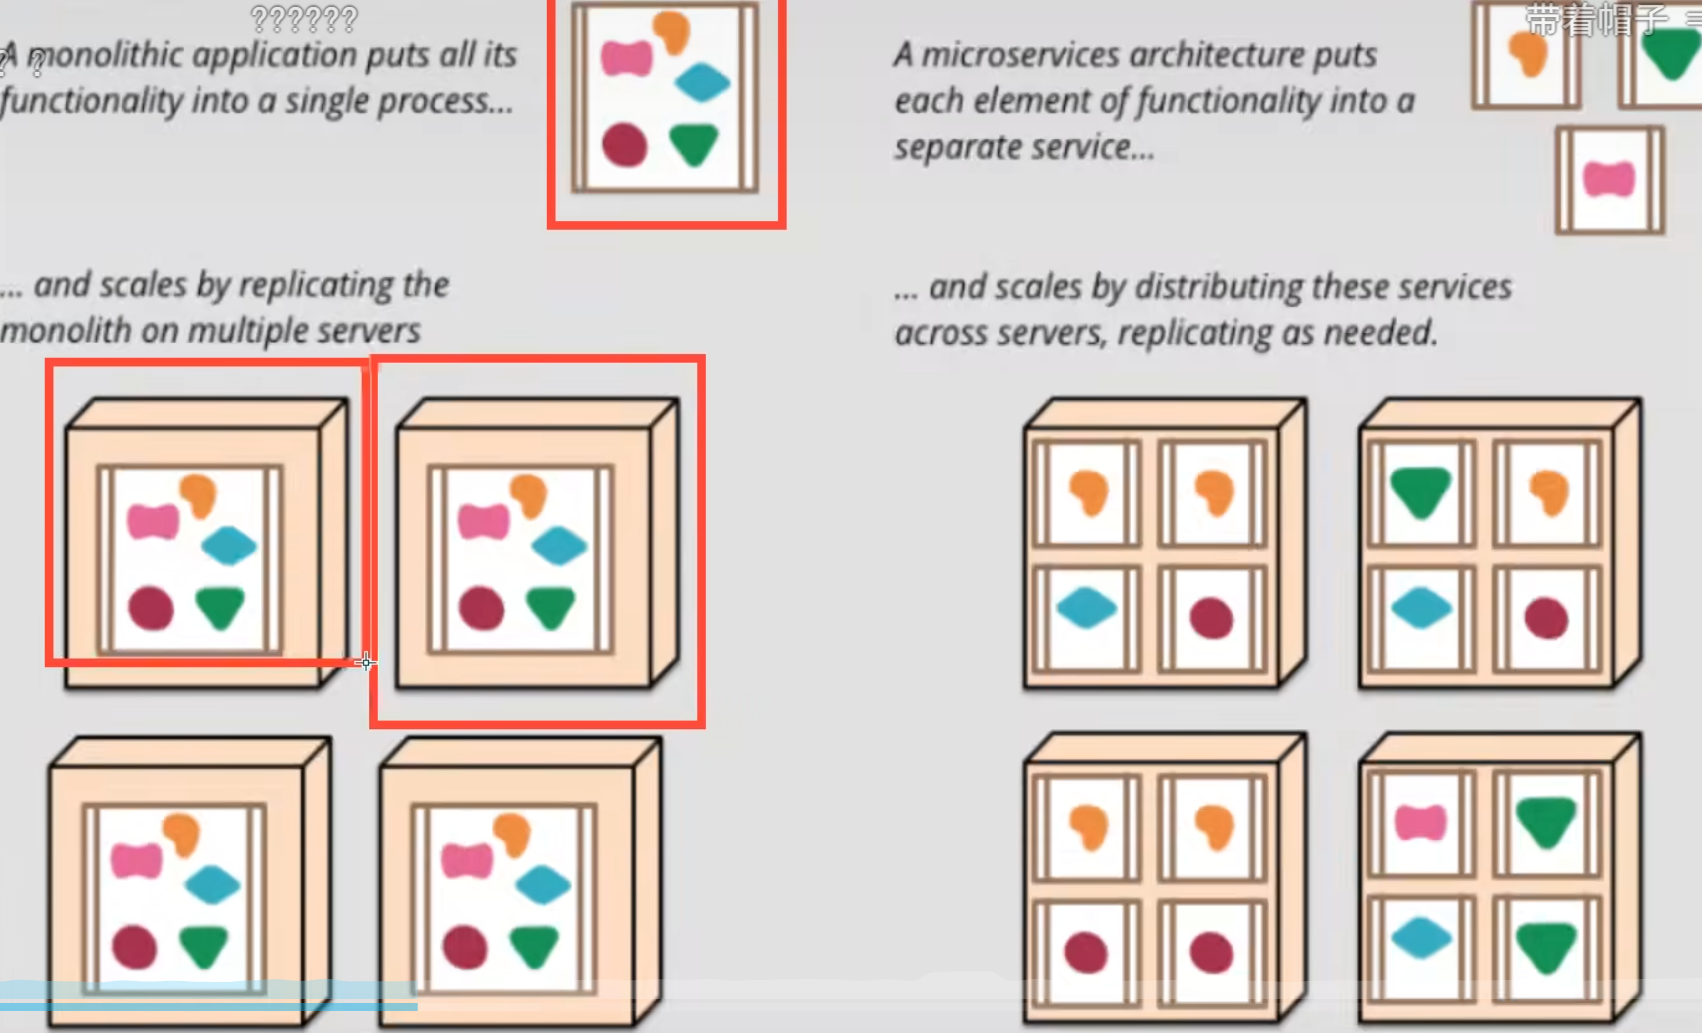
微服务架构(分块)
例如:
1
2
3
用户下单:controller! 背后: 仓库冻结:资金冻结;验证:购买成功,仓库数量减少,仓库解冻,资金解冻(太多了,容易崩,所以放在不同服务器上)把独立出来的功能元素的动态组合,需要的功能元素才去拿来组合,需要多一些时可以整合多个功能元素。所以微服务架构是对功能元素进行复制,而没有对整个应用进行复制。
服务和服务器之间接口连接,一个服务器需要维修,先提供缓存,更新好之后再连接接口
启动
启动服务
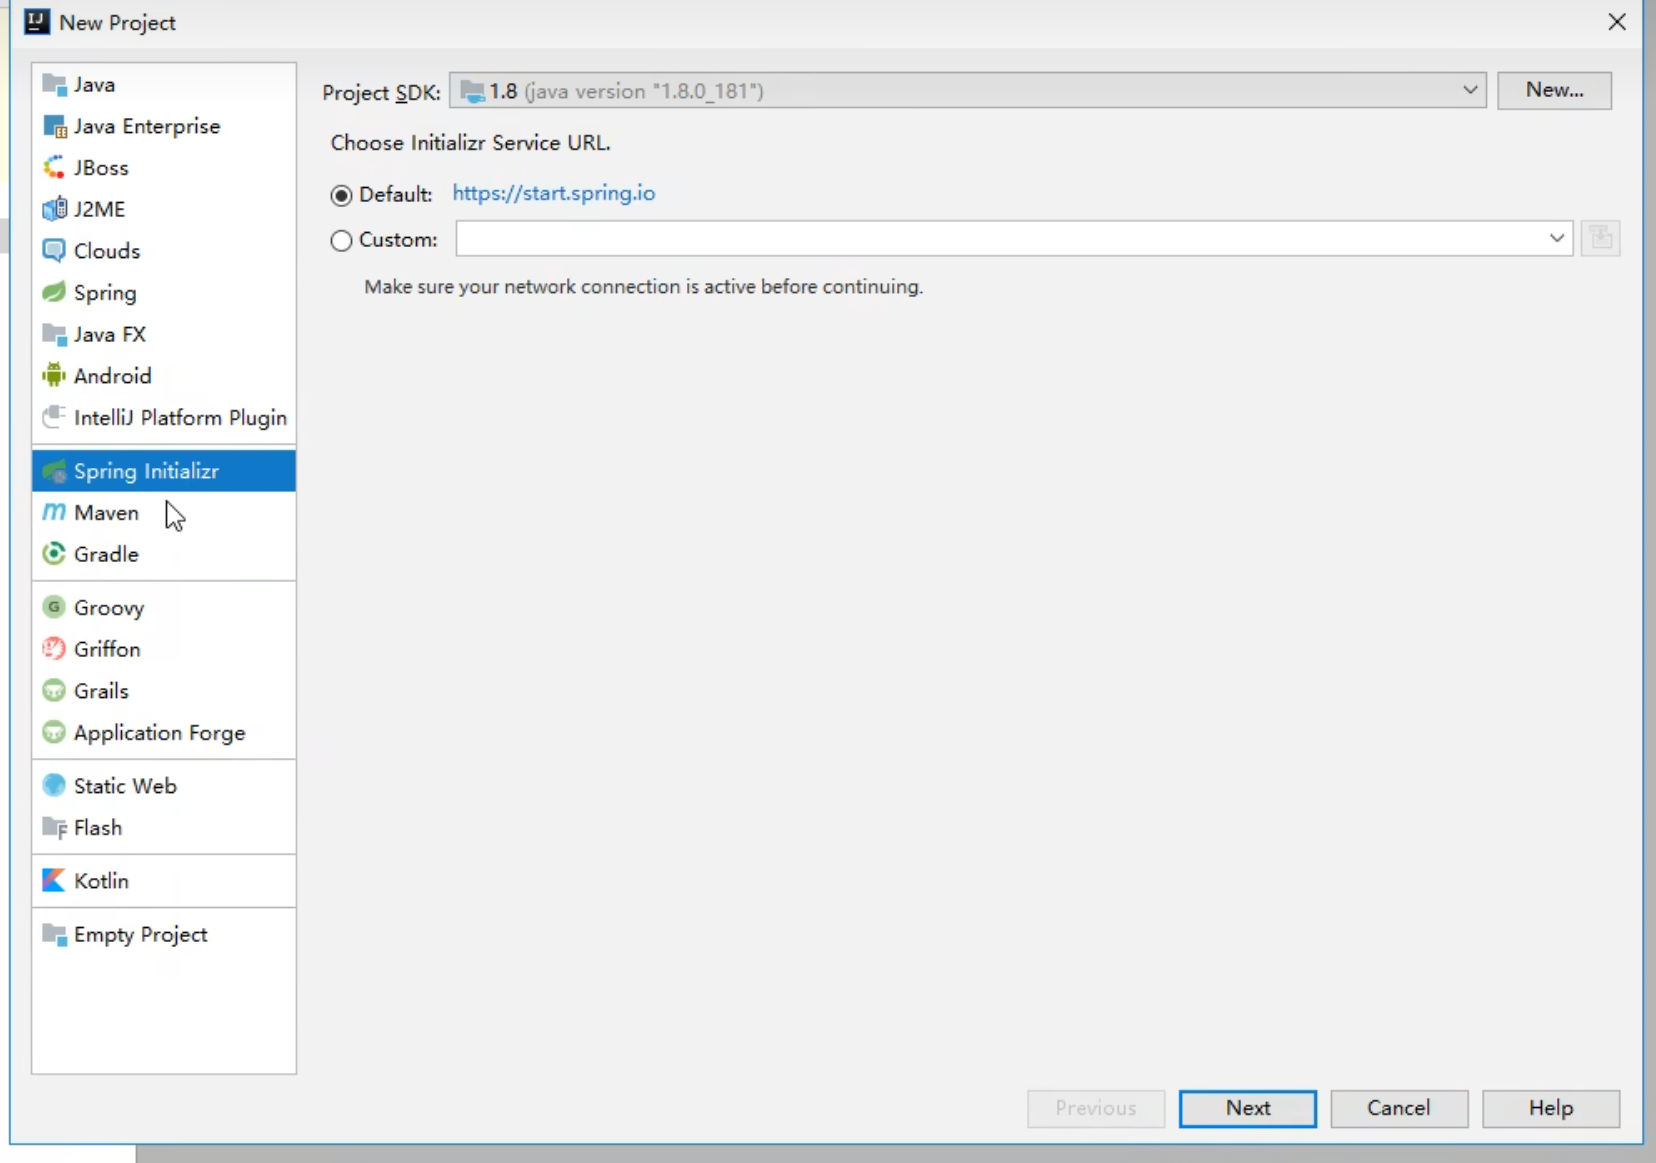
目录分析
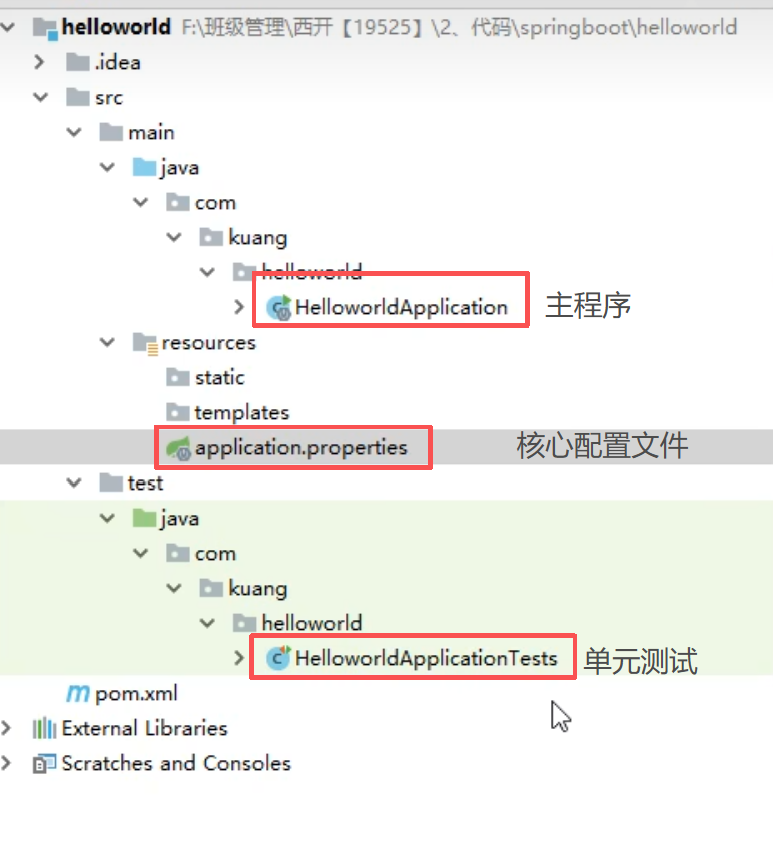
1
2
配置文件可以修改端口号    server.port=8081
修改spring的图标,找点自动生成的网站,如下图banner.txt
建立第一个项目一定要在application同级目录下
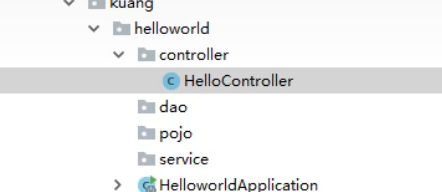
建立项目时,未导入依赖,可以在pom.xml文件里面自行写入
pom.xml里面的每一个东西都是一个启动器
注意:
- Maven 使用
pom.xml管理依赖和构建配置; - Gradle 则使用
build.gradle(或build.gradle.ktskotlin 脚本)
如果使用Gradle 构建就没有pom.xml文件
原理
自动配置:
先分析pom.xml
1
2
3
4
5
6
7
8
9
10
11
12
13
14
15
16
17
18
19
20
21
22
23
24
25
26
27
28
29
30
31
32
33
34
35
36
37
38
39
40
41
42
43
44
45
46
47
48
49
50
51
52
53
54
<?xml version="1.0" encoding="UTF-8"?>
<project xmlns="http://maven.apache.org/POM/4.0.0" xmlns:xsi="http://www.w3.org/2001/XMLSchema-instance"
	xsi:schemaLocation="http://maven.apache.org/POM/4.0.0 https://maven.apache.org/xsd/maven-4.0.0.xsd">
	<modelVersion>4.0.0</modelVersion>
	<parent>
		<groupId>org.springframework.boot</groupId>
		<artifactId>spring-boot-starter-parent</artifactId>
		<version>3.5.7</version>
		<relativePath/> <!-- lookup parent from repository -->
	</parent>
	<groupId>com.example</groupId>
	<artifactId>demo</artifactId>
	<version>0.0.1-SNAPSHOT</version>
	<name>demo</name>
	<description>demo</description>
	<url/>
	<licenses>
		<license/>
	</licenses>
	<developers>
		<developer/>
	</developers>
	<scm>
		<connection/>
		<developerConnection/>
		<tag/>
		<url/>
	</scm>
	<properties>
		<java.version>21</java.version>
	</properties>
	<dependencies>
		<dependency>
			<groupId>org.springframework.boot</groupId>
			<artifactId>spring-boot-starter-web</artifactId>
		</dependency>

		<dependency>
			<groupId>org.springframework.boot</groupId>
			<artifactId>spring-boot-starter-test</artifactId>
			<scope>test</scope>
		</dependency>
	</dependencies>

	<build>
		<plugins>
			<plugin>
				<groupId>org.springframework.boot</groupId>
				<artifactId>spring-boot-maven-plugin</artifactId>
			</plugin>
		</plugins>
	</build>

</project>- spring-boot-dependencies:核心依赖在父工程中!
- 我们在写或者引入一些SPringboot依赖的时候,不需要指定版本,就因为有这些版本仓库
启动器
1
2
3
4
<dependency>
			<groupId>org.springframework.boot</groupId>
			<artifactId>spring-boot-starter-web</artifactId>
		</dependency>
说白了就是Springboot的启动场景
比如spring-boot-starter-web,他就会帮我们自动导入web环境所有的依赖!
(spring-boot-starte-xxxxx xxx就是相关的环境名称)
springboot会将所有的功能场景,都变成一个个的启动器
我们要使用什么功能,就只需要找到对应的启动器就可以了
主程序
1
2
3
4
5
6
7
8
9
10
11
12
13
package com.example.demo;

import org.springframework.boot.SpringApplication;
import org.springframework.boot.autoconfigure.SpringBootApplication;

@SpringBootApplication
public class DemoApplication {

	public static void main(String[] args) {
		SpringApplication.run(DemoApplication.class, args);
	}

}
注解(相当于是启动类)
(1)控制层注解
1
2
3
4
5
6
7@RestController // = @Controller + @ResponseBody,返回 JSON类型的数据 eg:浏览器 → [@RestController] → 所有方法自动带“直接给包裹”属性 → 输出:{"name":"张三", "age":20} → 直接返回给浏览器 @RequestMapping("/user") // 路径映射 @GetMapping("/list") // GET 请求 @PostMapping("/add") // POST 请求 @PutMapping("/update") // PUT 请求 @DeleteMapping("/delete") // DELETE 请求(2)Bean 管理注解
将对象交给 Spring 容器管理,javabbean就是java的类
这类注解用于标记类,告诉 Spring:“这个类的对象由你创建并管理”,无需手动
new对象1
2
3
4@Component // 通用组件 @Service // 业务层 @Repository // 数据层 @Controller // 控制层(3)依赖注入
1
2
3@Autowired // 自动注入 @Resource // JSR-250 注入(常见于兼容老项目) @Value("${server.port}") // 获取配置(4)配置注解
1
2
3
4@Configuration // 配置类 @Bean // 方法上定义 Bean 就是将方法作为对象存储,在下次使用的时候不需要再次new,直接调用即可 @ConfigurationProperties(prefix = "myconfig") // 配置属性绑定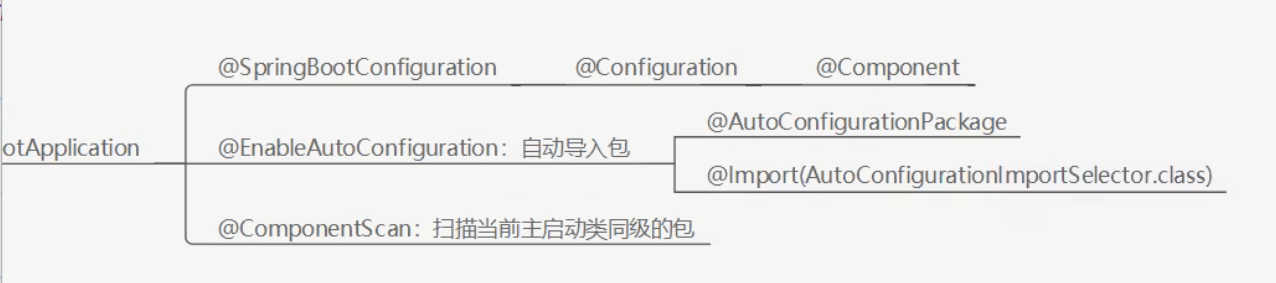
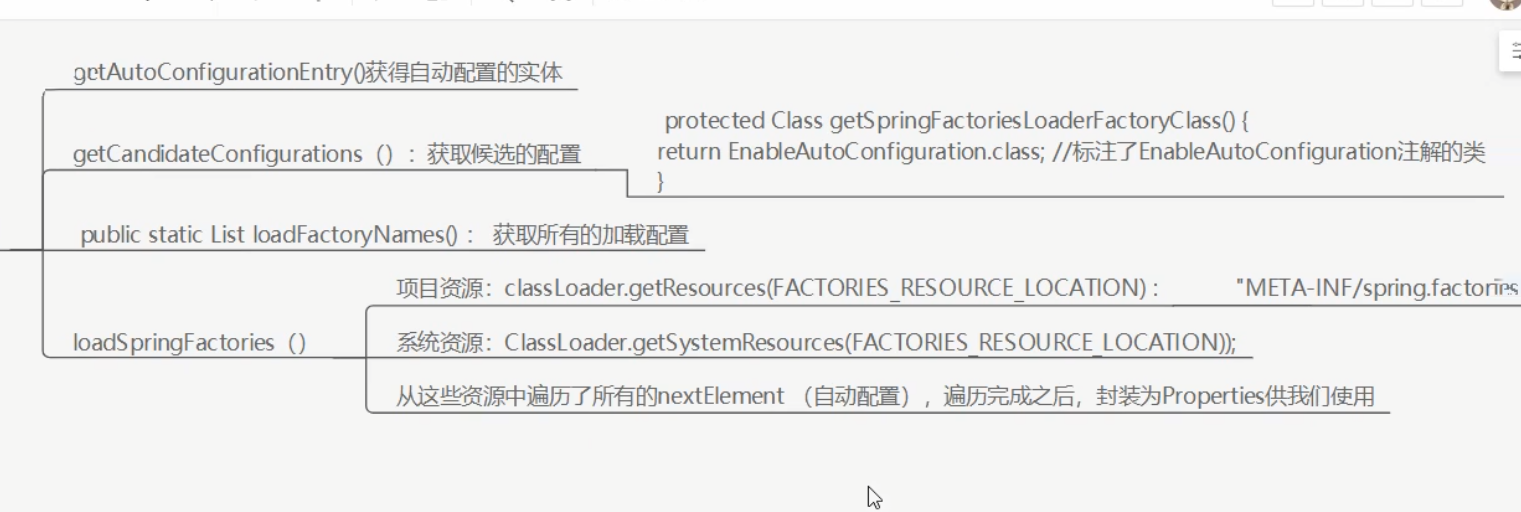

注意:这么多自动配置为什么有的没有生效,需要导入对应的start才能有作用???
核心注解:@ConditionalOnXXX:如果这里面的条件都满足,才会生效
结论:
自动导入的核心文件:
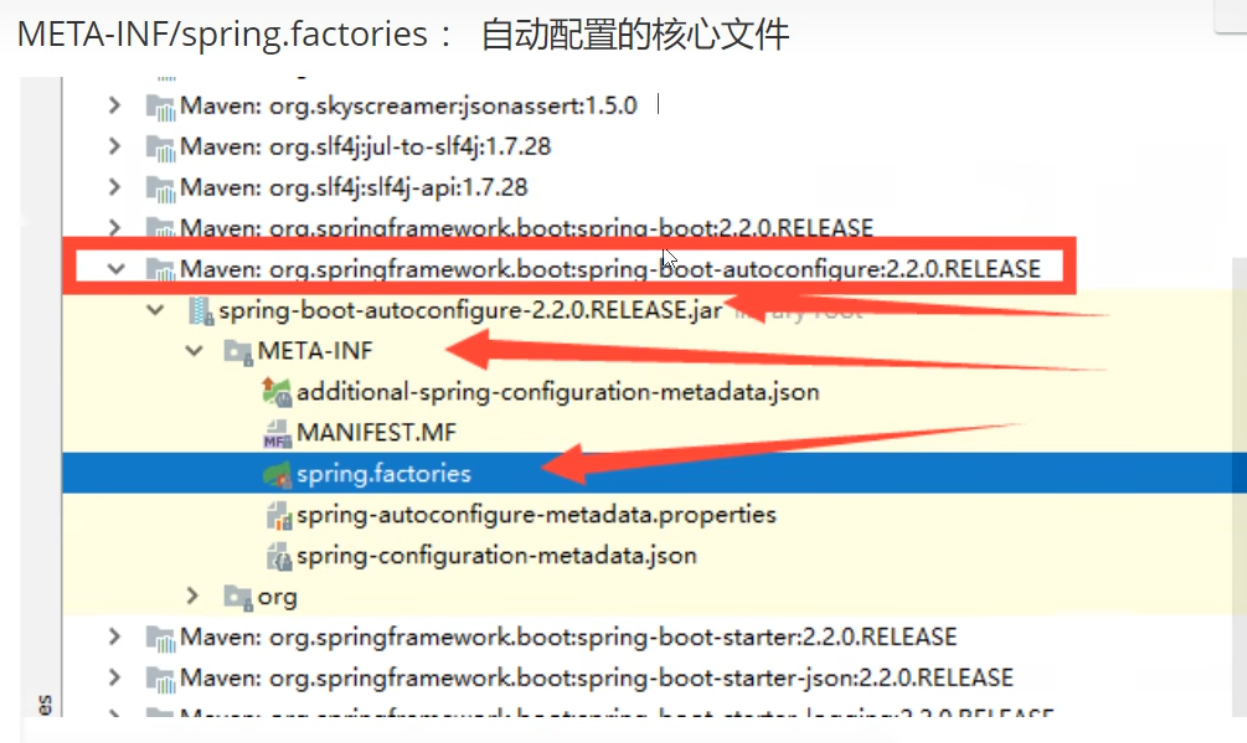
springboot所有自动配置都是在启动的时候扫描并加载:spring.factories 所有的自动配置类都在这里面,但是不一定生效,要判断条件是否成立,只要导入了 对应的 start ,就有对应的启动器了,有了启动器,我们自动装配就会生效,然后就配置成功!
- springboot在启动的时候,从类路径下 /META-INF/spring.factories 获取指定的值;
- 将这些自动配置的类导入容器,自动配置就会生效,帮我进行自动配置!
- 以前我们需要自动配置的东西,现在springboot帮我们做了!
- 整合javaEE,解决方案和自动配置的东西都在 spring-boot-autoconfigure-2.2.0.RELEASE.jar 这个包下
- 它会把所有需要导入的组件,以类名的方式返回,这些组件就会被添加到容器;
- 容器中也会存在非常多的xxxAutoConfiguration的文件(@Bean),就是这些类给容器中导入了这个场景需要的所有组件;并自动配置, @Configuration,JavaConfig!
- 有了自动配置类,免去了我们手动编写配置文件的工作!
主程序启动
最初以为就是运行了一个main方法,没想到却开启了一个服务
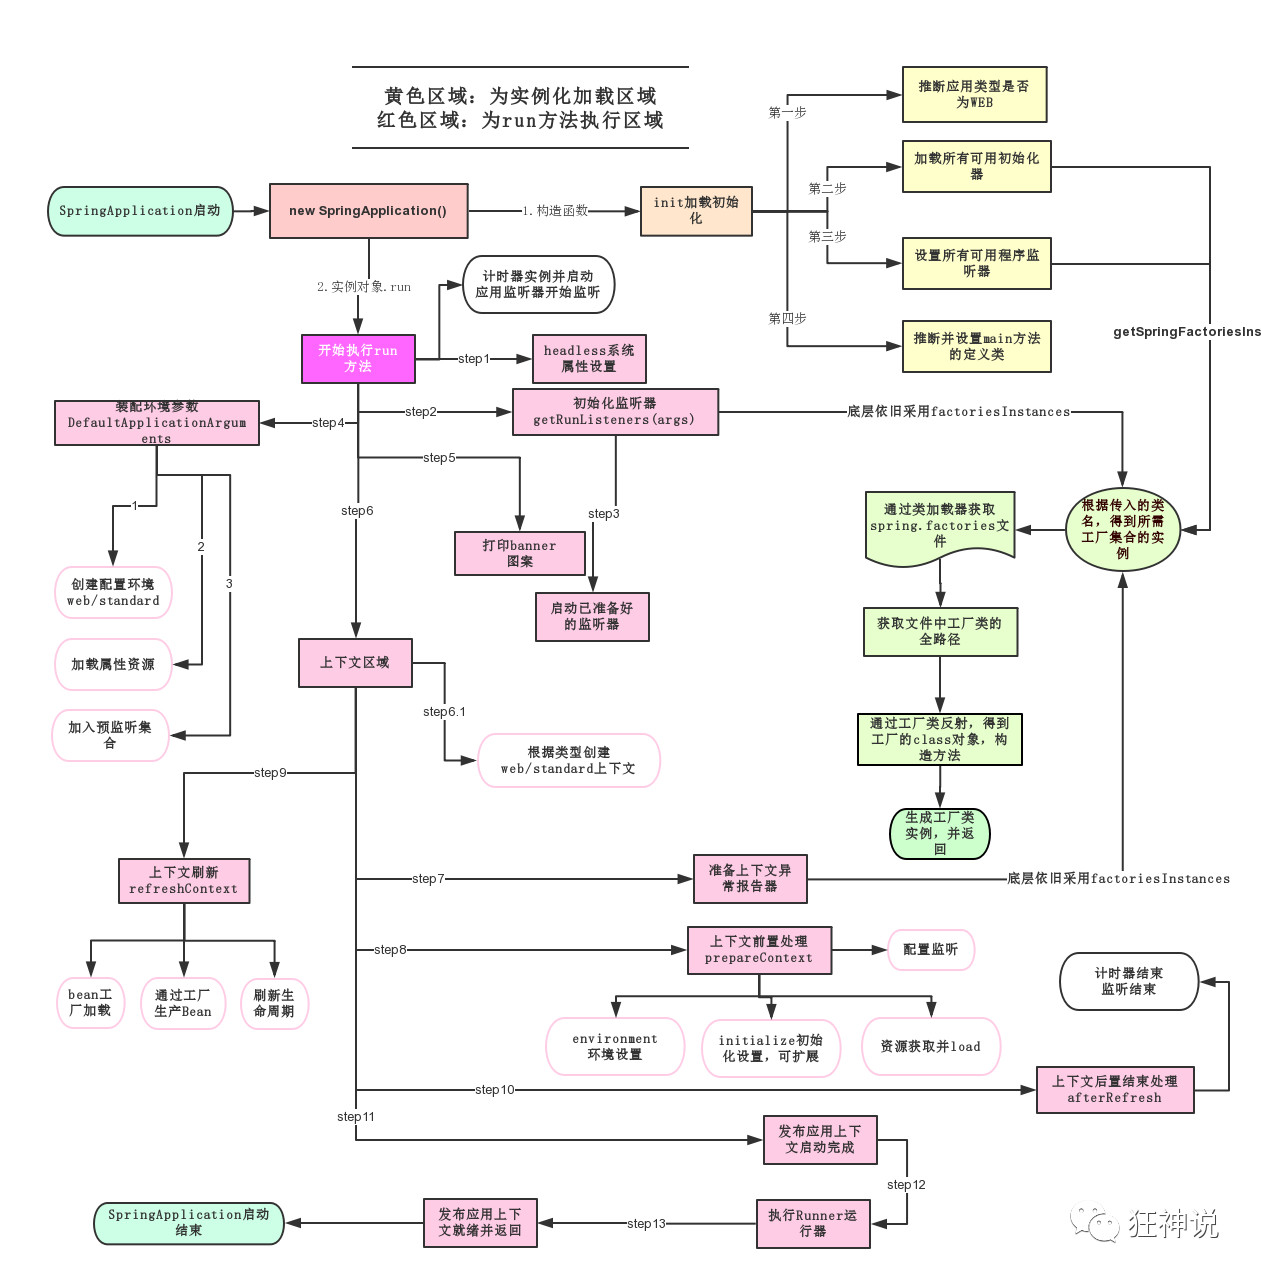
- 一部分是SpringApplication的实例化
- 二是run方法的执行
SpringApplication主要:
1、推断应用的类型是普通的项目还是Web项目
2、查找并加载所有可用初始化器 , 设置到initializers属性中
3、找出所有的应用程序监听器,设置到listeners属性中
4、推断并设置main方法的定义类,找到运行的主类
run流程分析:
关于SpringBoot的理解
1、自动装配
2、run() 是普通的项目还是Web项目
推断当前的主类是哪个(你也可以自己写带有注解的主类,不使用默认的但是记得干掉它)
编译处理上下文的bean
自动装配的全面接管SpringMVC的配置
使用
配置
热部署

如何配置

这个可以删,自己重写一个,但是application不能变,变后缀
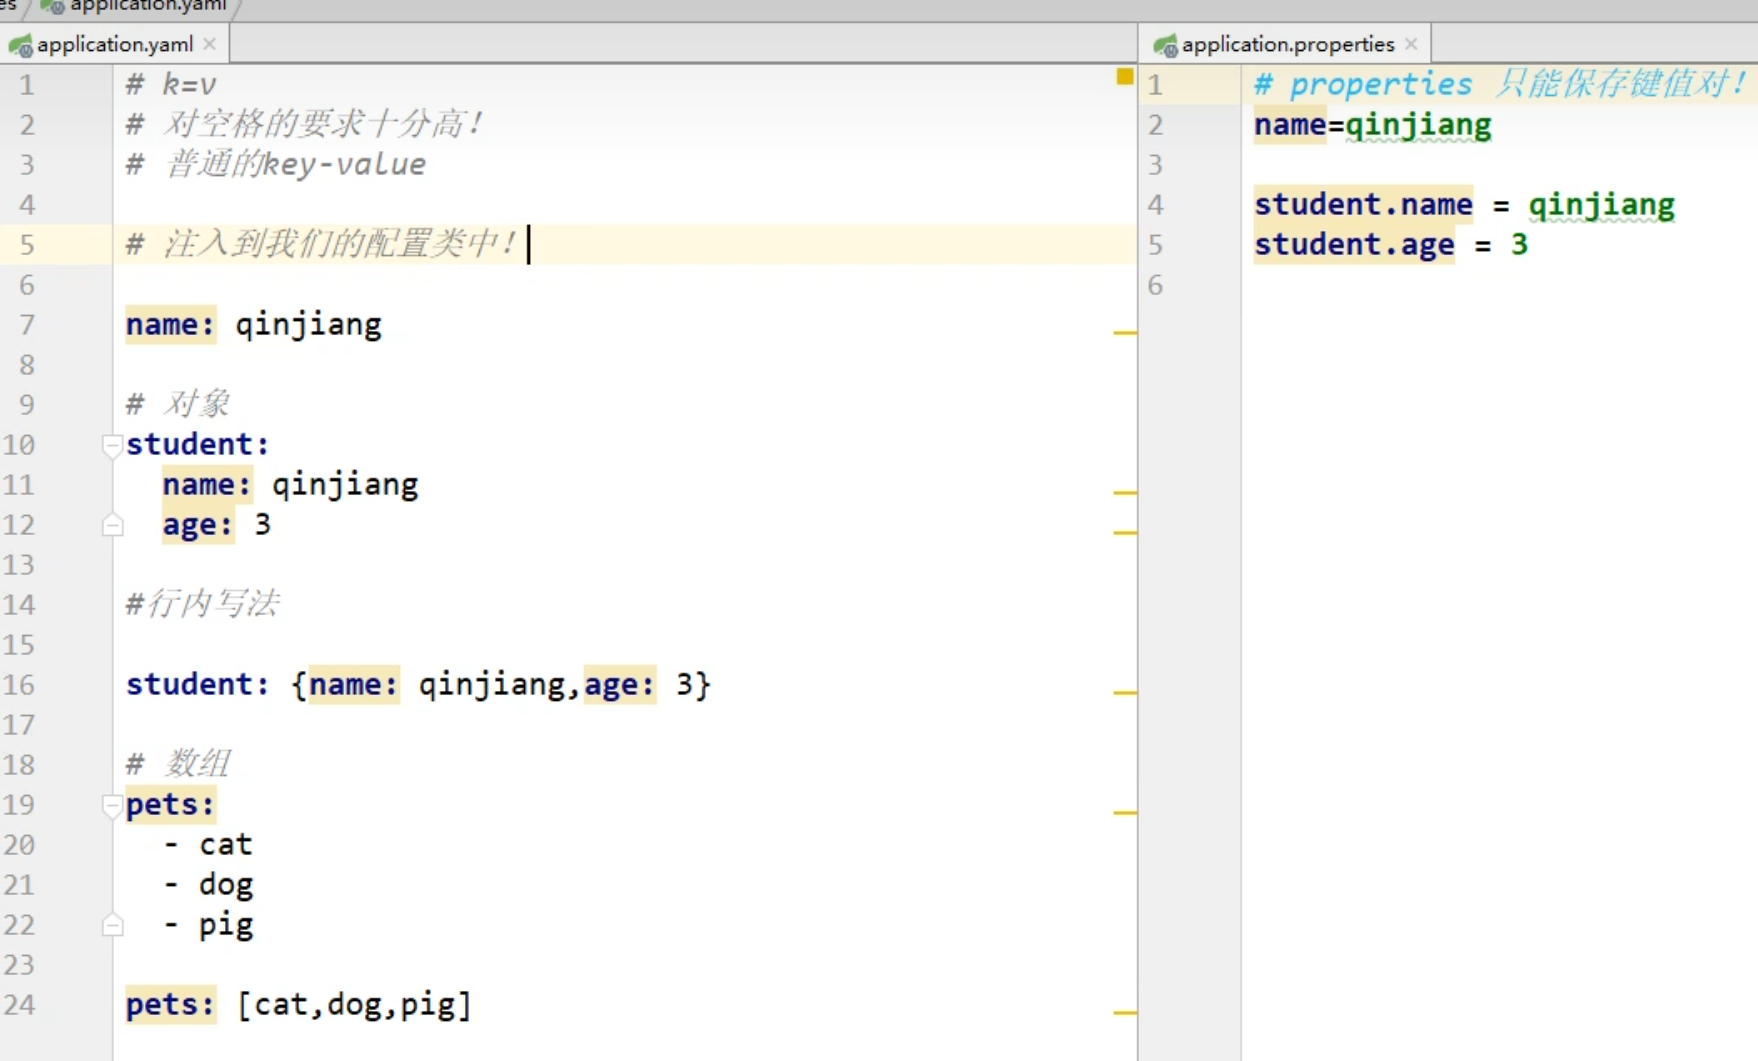
application.yaml是什么?
SpringBoot使用一个全局的配置文件 , 配置文件名称是固定的
application.properties
语法结构 :key=value
1
server.port=8081
application.yaml
语法结构 :key:空格 value
1
2
3server: port: 8081 #这必须有空格,不然就就报错配置文件的作用 :*修改SpringBoot自动配置的*默认值**,因为SpringBoot在底层都给我们自动配置好了
(可以同时存在两个配置文件,两个有优先级)
区别:
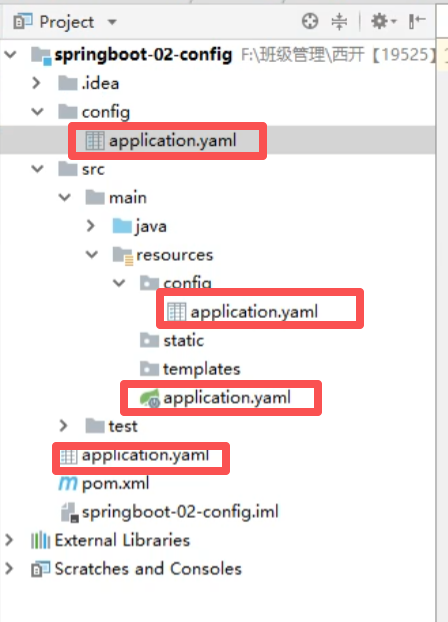
配置文件可以存在的路径(yaml)(同时代表了优先级)
flie:./config/(在主文件夹新建一个config目录,写yaml文件)
file:./(和主文件夹同级,写yaml文件)
classpath:/config/(在类文件下新建config目录,写yaml文件)
classpath:/(和类文件夹同级,写yaml文件)
配置多个环境
properties
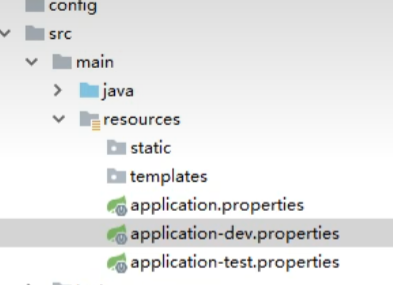
正常启动走的是默认的配置文件(8080)
如何走其他的配置文件呢??
直接在默认的配置文件里面写
1
spring.profiles.active=dev//要么写dev,要么写test(就是写—后面你那个东西)(其他配置文件记得写端口)
yaml
1
2
3
4
5
6
7
8
9
10
11
12
13
14server: port: 8081 --- server: port: 8082 spring: profiles: dev --- server: port: 8083 spring: profiles: test激活:
1
2
3spring: profiles: active: dev
自动装配原理
精髓:
1)、SpringBoot启动会加载大量的自动配置类
2)、我们看我们需要的功能有没有在SpringBoot默认写好的自动配置类当中:
3)、我们再来看这个自动配置类中到底配置了哪些组件;(只要我们要用的组件存在在其中,我们就不需要再手动配置了)
4)、给容器中自动配置类添加组件的时候,会从properties类中获取某些属性。我们只需要在配置文件中指定这些属性的值即可:
xxxxAutoConfigurartion:自动配置类:给容器中添加组件
xxxxProperties:封装配置文件中相关属性(通过配置文件修改(yaml))查看自动配置类有没有生效
1
debug = true;//返回日志,
赋值
原生方式(spring)
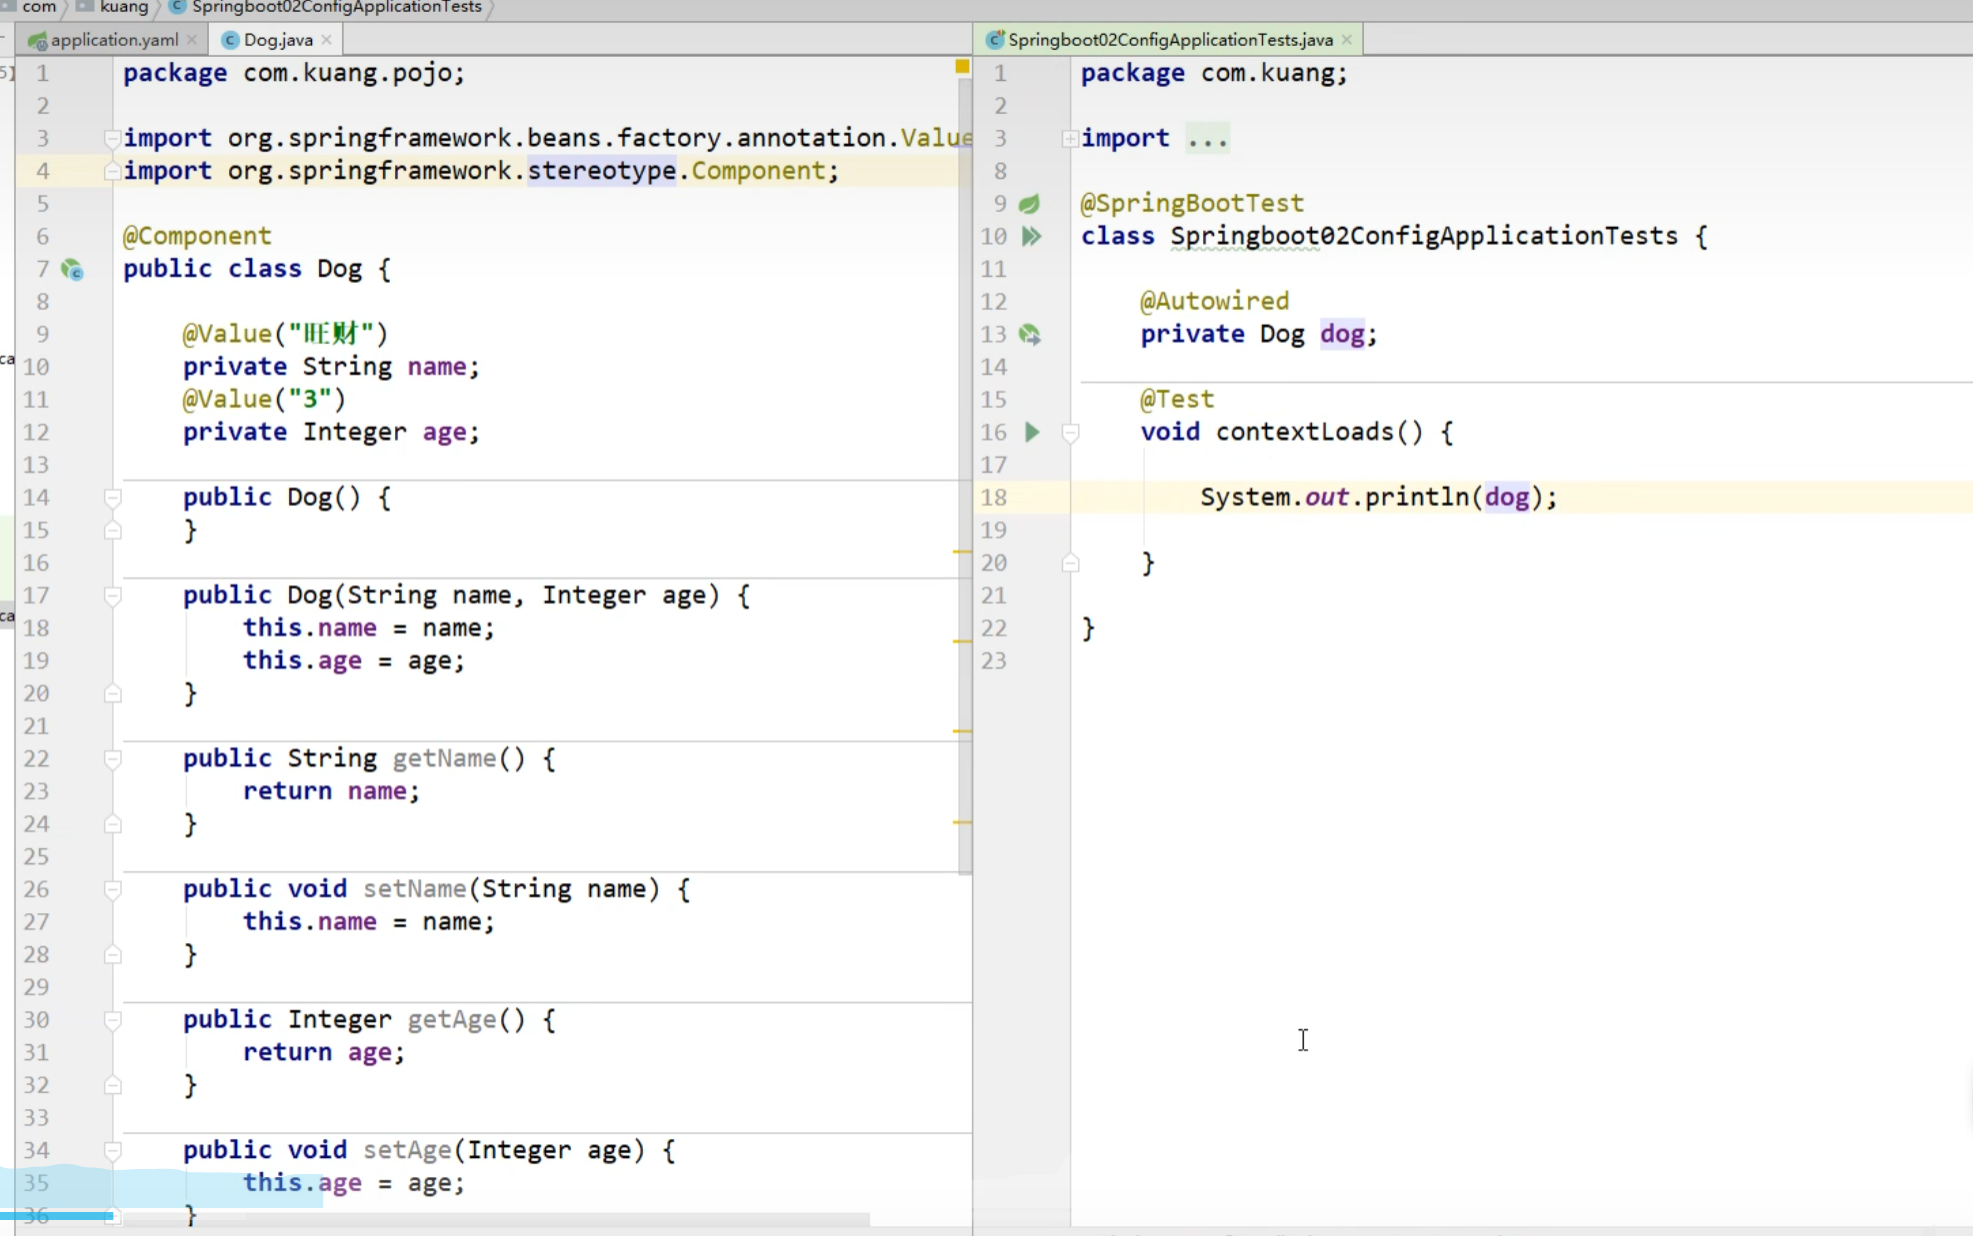
yaml赋值
赋值的注解问题:(这个配置,可配可不配,不影响程序运行)
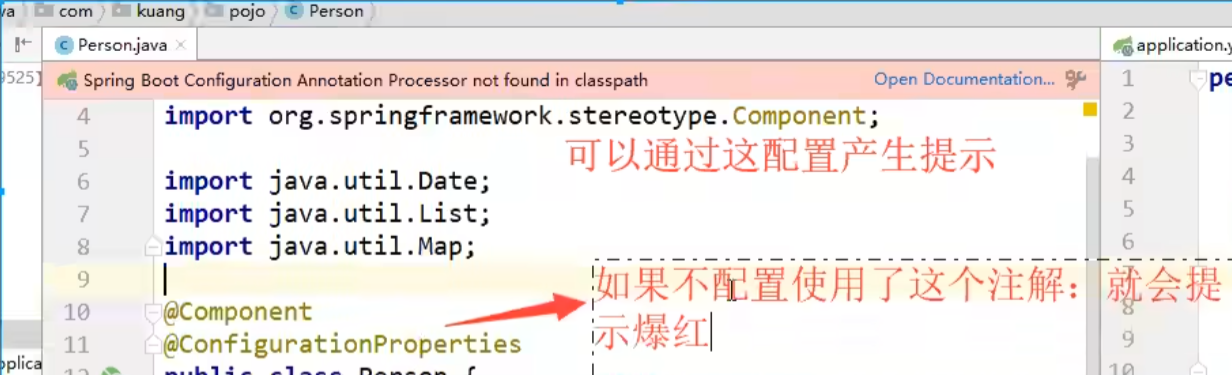
直接利用这个注解,将yaml文件的值和类的值进行绑定
1
@Configuration(prefix = "person")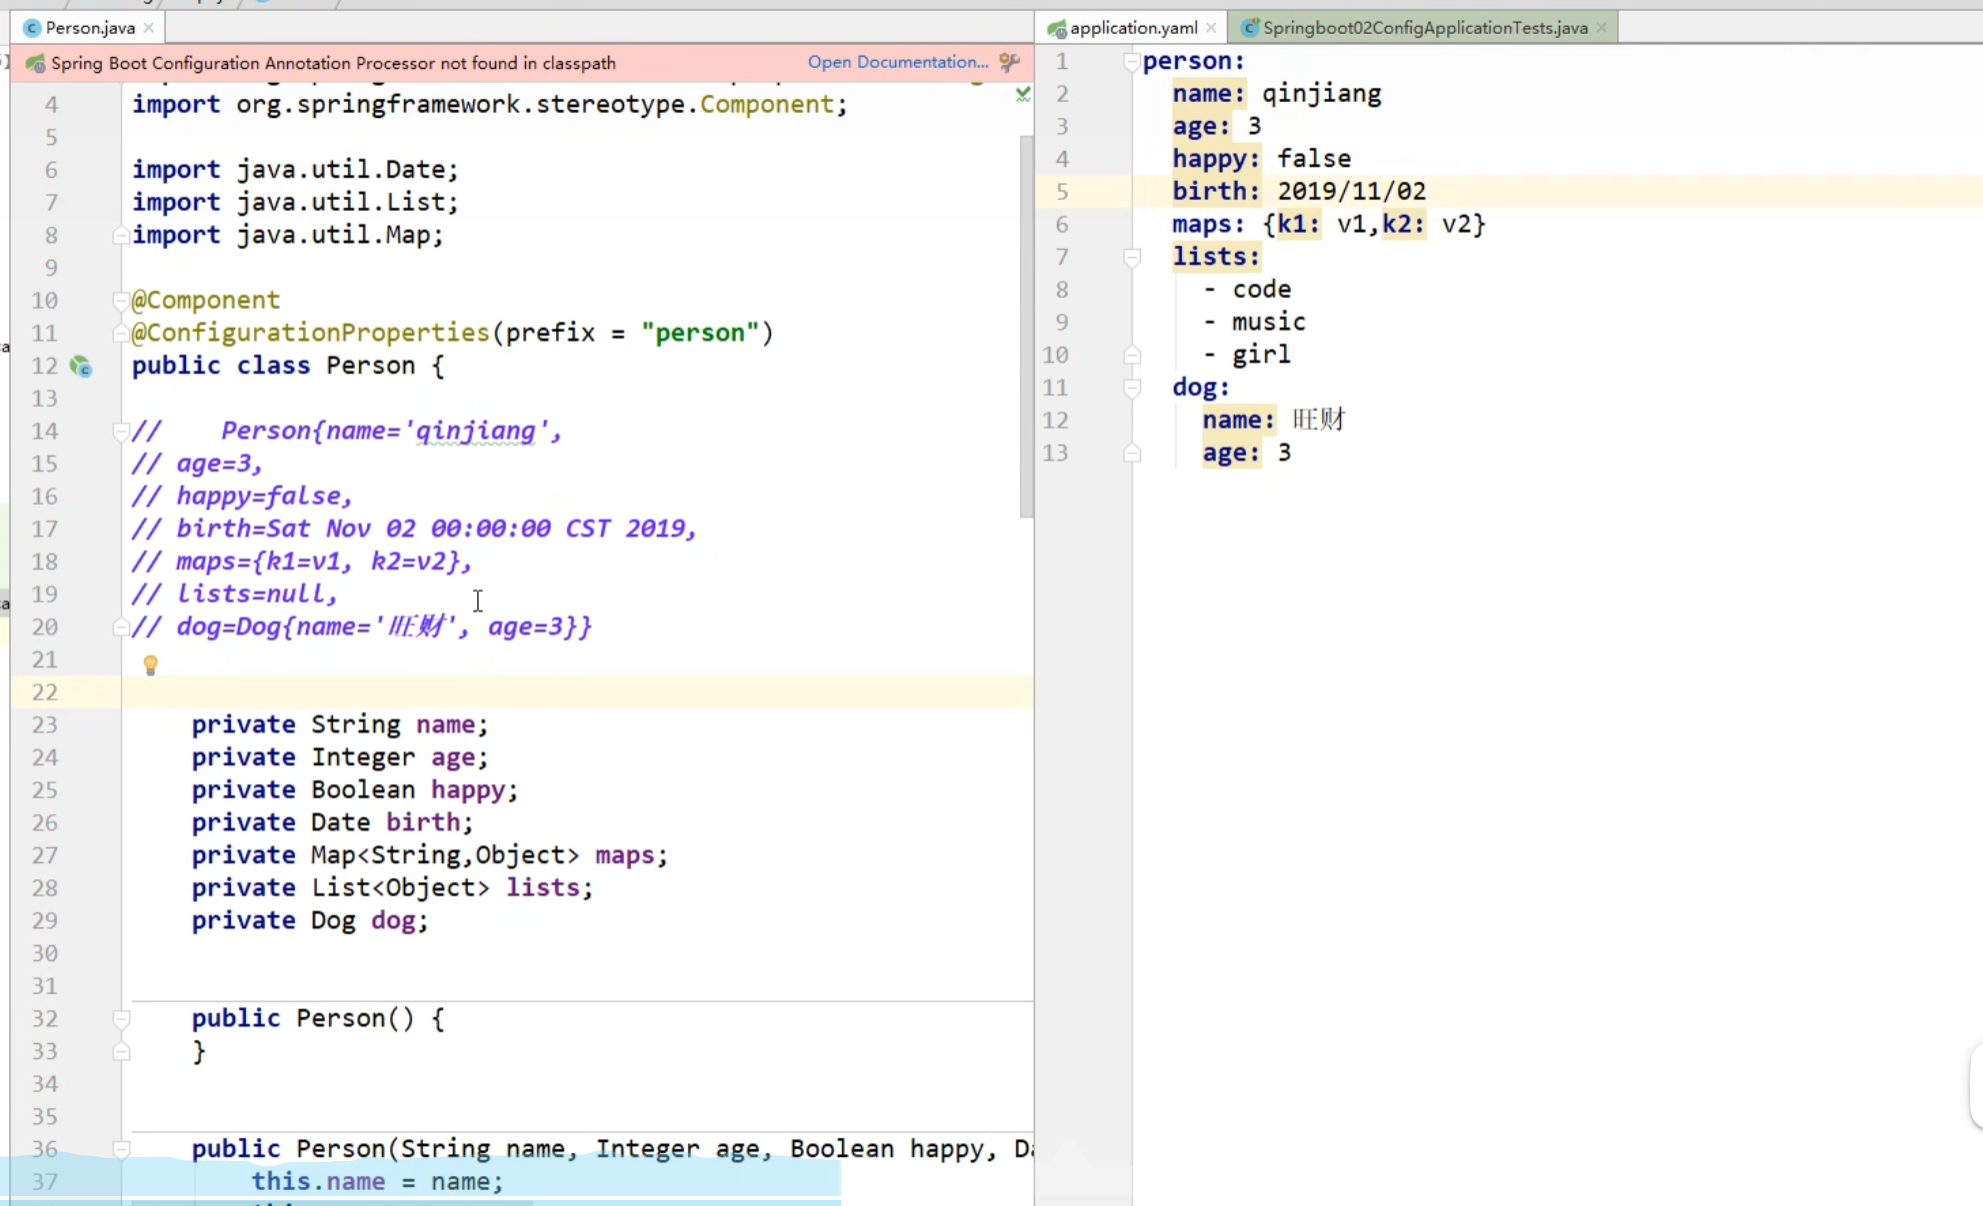
在测试文件写输出语句
1
2
3
4
5
6
7
8
9
10
11
12
13
14
15package com.test; import ... @SpringBootTest class Springboot02ConfigApplicationTests { @Autowired private Person person; @Test void contextLoads() { System.out.println(person); } }使用properties
不用使用上面的注解,换一个
1
2
3
4
5
6@PropertySource(value = "classpath:mmm.properties") //mmm.properties是你传参的properties文件 @Value("${name}") //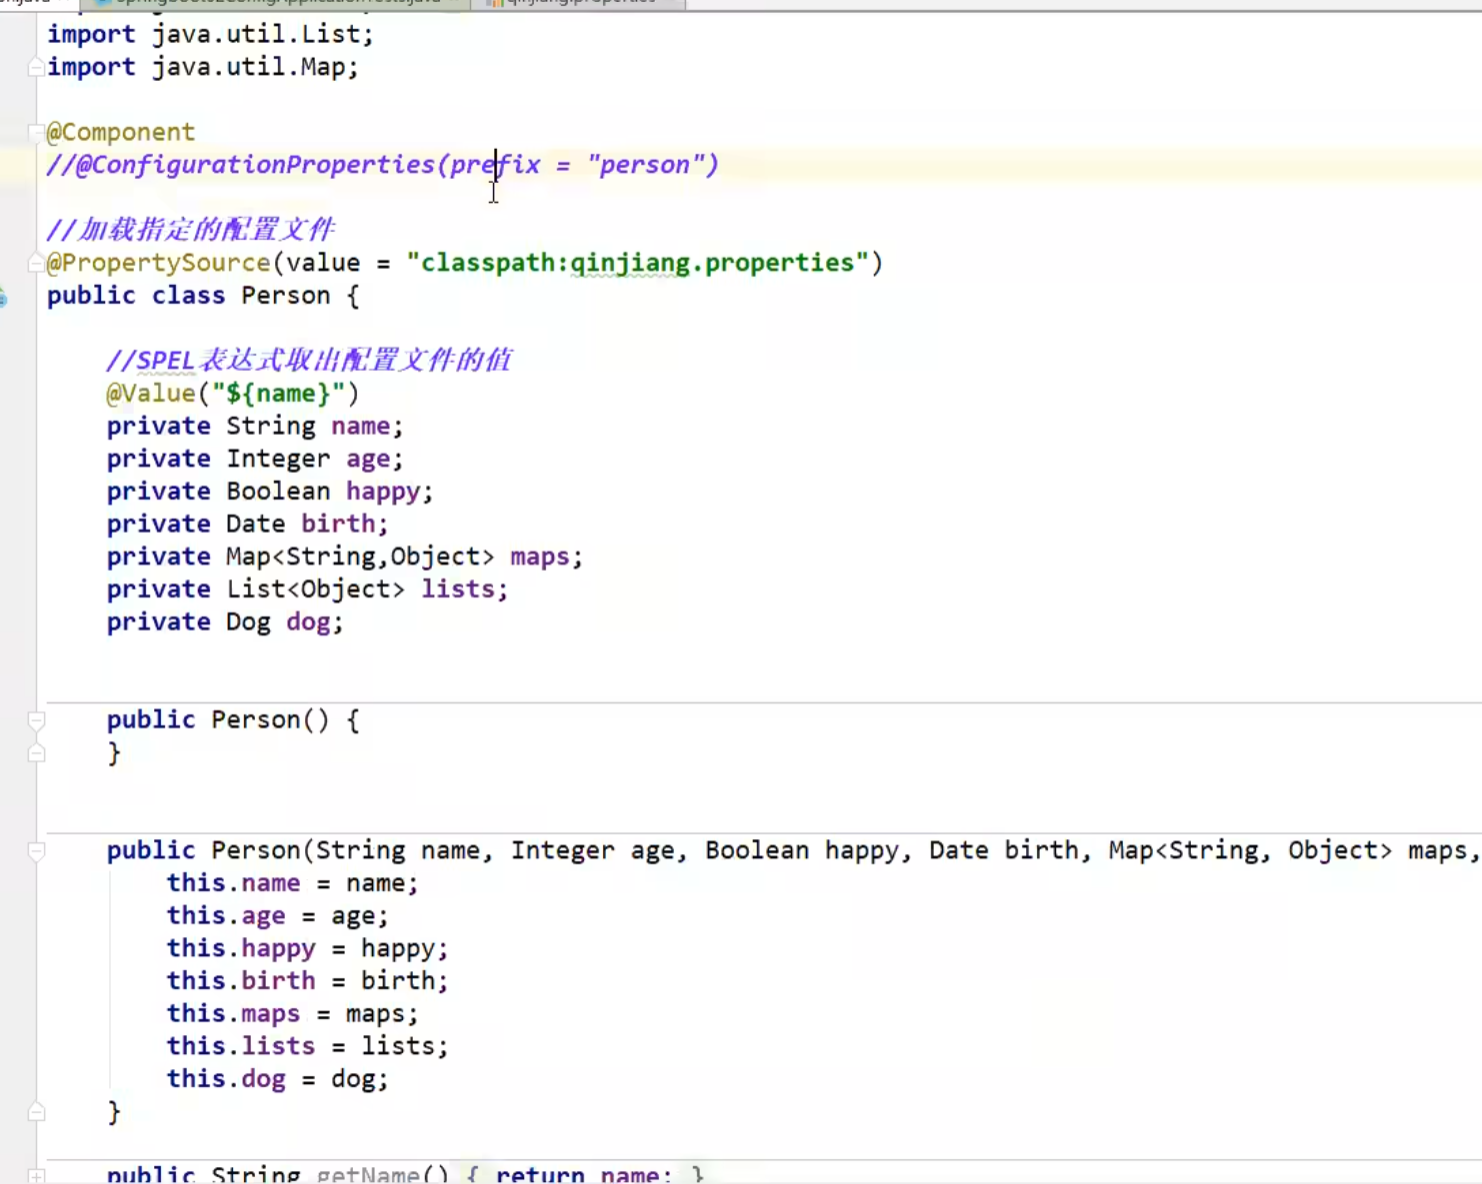
结论:
配置yml和配置properties都可以获取到值 ( 强烈推荐 yml)
如果我们在某个业务中,只需要获取配置文件中的某个值,可以使用一下 @value(spring)
如果说,我们专门编写了一个JavaBean来和配置文件进行映射,就直接使用@configurationProperties,不要犹豫!(Properties)
JSP303校验
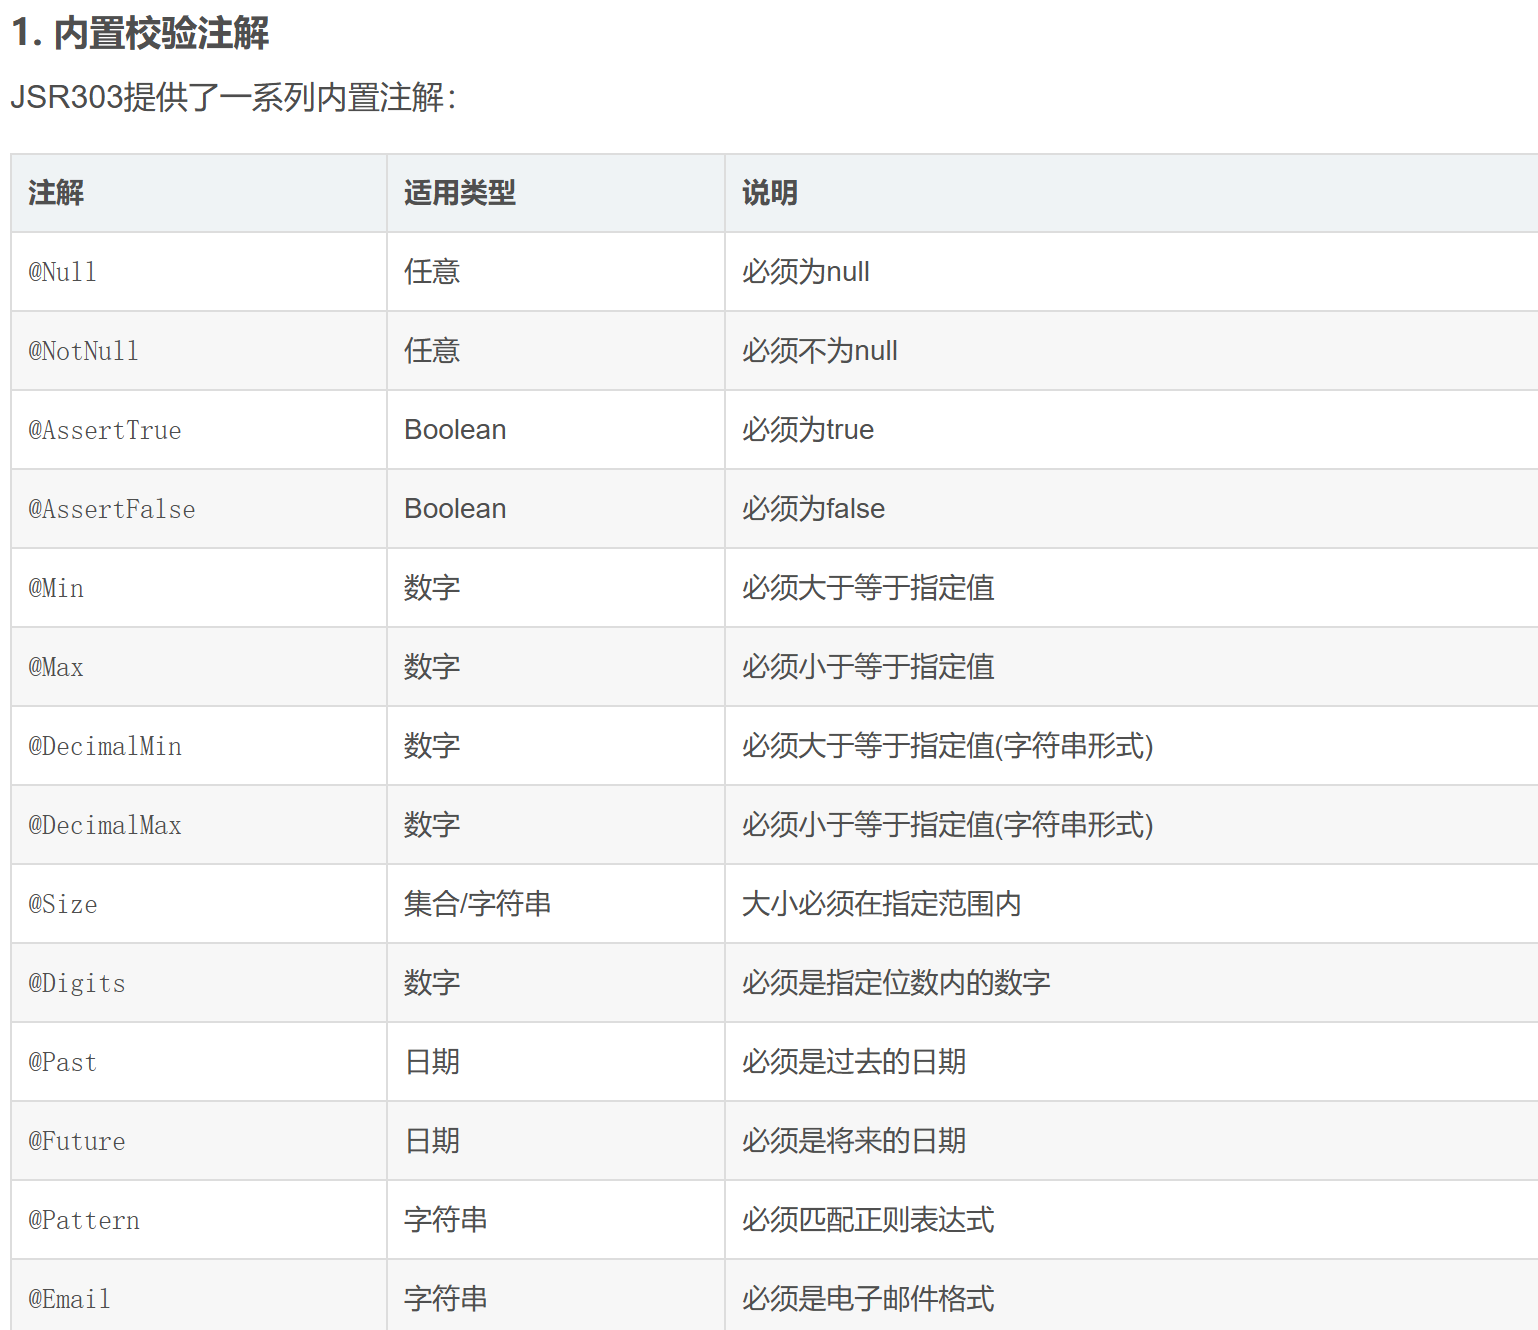
强制格式
松散绑定:
yml中写的last-name,这个和lastName是一样的,后面跟着的字母默认是大写的。
这就是松散绑定
SpringbootWeb开发
之前都是jar包,webapp没处放(问题衍生)
springboot特点:自动装配
springboot 到底帮我们配置了什么? 我们能不能进行修改? 能修改哪些东西? 能不能扩展?
- xxxxAutoConfiguraion..向容器中自动配置组件
- xxxxProperties:自动配置类,装配配置文件中自定义的一些内容!
要解决的问题
- 导入静态资源…
- 网页首页(出现404报错问题)
- 写jsp,通过模板引擎
Thymeleaf - 装配扩展SpringMVC
- 增删改查
- 拦截器
- 国际化(中英文切换)
静态资源导入
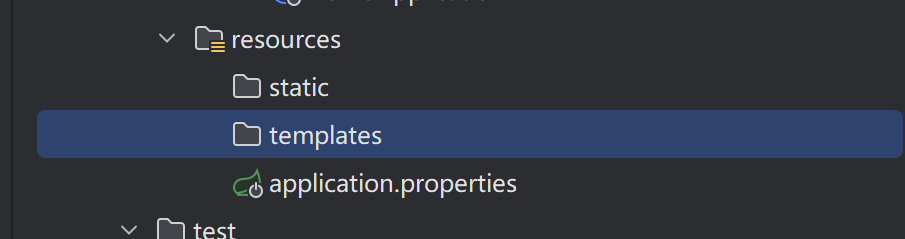
创建文件的时候,就默认存在了资源包(静态和模板)
查看自动装配的源码
1
2
3
4
5
6
7
8
9
10
11
12
13
14
15public void addResourceHandlers(ResourceHandlerRegistry registry) { if (!this.resourceProperties.isAddMappings()) { logger.debug("Default resource handling disabled"); } else { this.addResourceHandler(registry, this.mvcProperties.getWebjarsPathPattern(), "classpath:/META-INF/resources/webjars/"); this.addResourceHandler(registry, this.mvcProperties.getStaticPathPattern(), (Consumer)((registration) -> { registration.addResourceLocations(this.resourceProperties.getStaticLocations()); if (this.servletContext != null) { ServletContextResource resource = new ServletContextResource(this.servletContext, "/"); registration.addResourceLocations(new Resource[]{resource}); } })); } }添加静态资源的
webjars/导入一个静态资源包xxx.jar
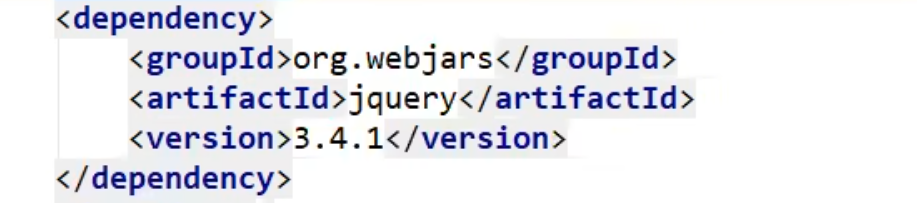
写到pom.xml里面,等待下载之后直接就会部署到扩展包中
源码提到路径:
1
"classpath:/META-INF/resources/webjars/"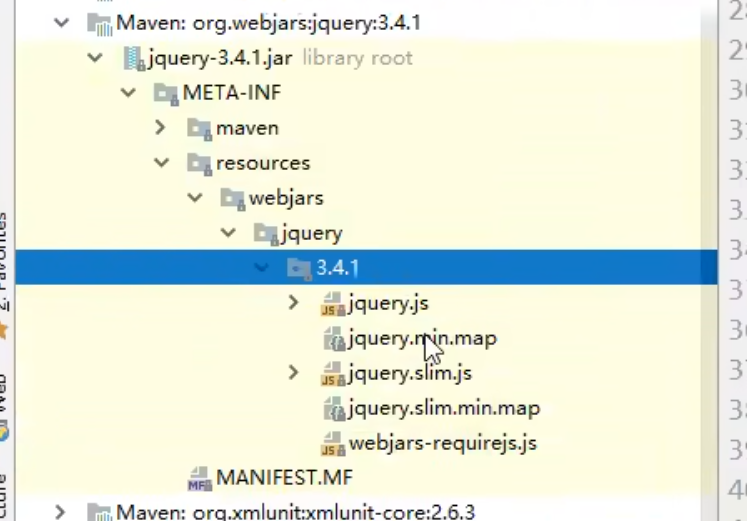
自主导入的静态资源
webjars/...就会映射到这个路径下直接访问可得到源码
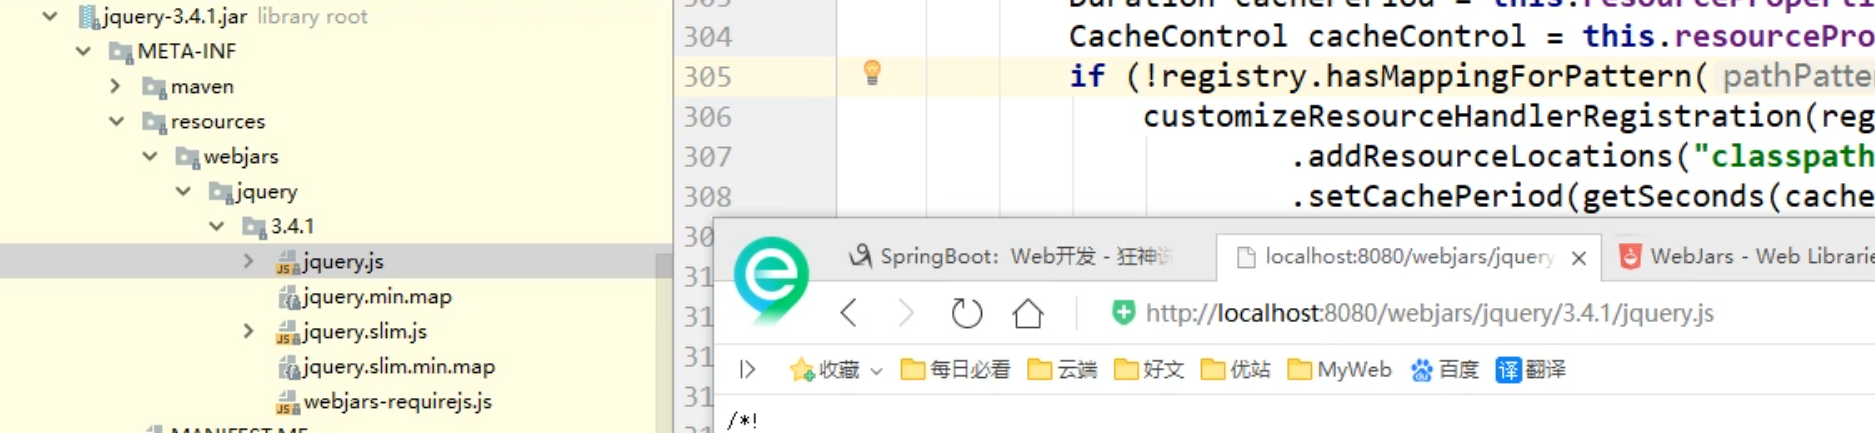
ResourceHandlerRegistry registry是一个回调方法
前端访问什么路径(如
/static/**)时,系统会去哪个目录(如classpath:/static/)找对应的静态资源(跟上面的webjars一样)普通静态资源映射
1
2
3
4
5
6
7this.addResourceHandler(registry, this.mvcProperties.getStaticPathPattern(), (Consumer)((registration) -> { registration.addResourceLocations(this.resourceProperties.getStaticLocations()); if (this.servletContext != null) { ServletContextResource resource = new ServletContextResource(this.servletContext, "/"); registration.addResourceLocations(new Resource[]{resource}); } }));this.mvcProperties.getStaticPathPattern():获取静态资源的访问路径规则,默认是/**(可通过spring.mvc.static-path-pattern配置修改,比如改为/static/**)Lambda 表达式,于配置资源的存放目录(
ResourceLocations)1
2registration.addResourceLocations(this.resourceProperties.getStaticLocations()):ResourceProperties.getStaticLocations() //返回 Spring Boot 默认的静态资源目录,顺序是:classpath:/META-INF/resources/、classpath:/resources/、classpath:/static/、classpath:/public/(可通过
spring.resources.static-locations自定义修改,但是一旦自定义,默认的目录就失效了)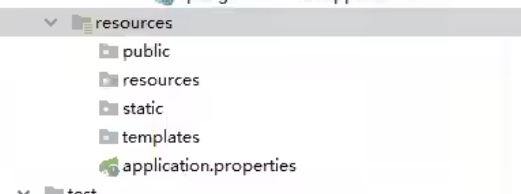
按照上面的默认目录:有4个
总结:
- 在springboot,我们可以使用以下方式处理静态资源
- webjars
localhost:8080/webjars/ - public,static, /**,resources
localhost:8080/
- webjars
- 比较这四个目录的优先级:resources>static(默认)>public
- 在springboot,我们可以使用以下方式处理静态资源
首页定制
依旧查看配置源码
WebMvcAutoConfiguration.class1
2
3
4
5
6
7
8
9
10
11
12
13
14
15
16
17
18@Bean public WelcomePageHandlerMapping welcomePageHandlerMapping(ApplicationContext applicationContext, FormattingConversionService mvcConversionService, ResourceUrlProvider mvcResourceUrlProvider) { return (WelcomePageHandlerMapping)this.createWelcomePageHandlerMapping(applicationContext, mvcConversionService, mvcResourceUrlProvider, WelcomePageHandlerMapping::new); } @Bean public WelcomePageNotAcceptableHandlerMapping welcomePageNotAcceptableHandlerMapping(ApplicationContext applicationContext, FormattingConversionService mvcConversionService, ResourceUrlProvider mvcResourceUrlProvider) { return (WelcomePageNotAcceptableHandlerMapping)this.createWelcomePageHandlerMapping(applicationContext, mvcConversionService, mvcResourceUrlProvider, WelcomePageNotAcceptableHandlerMapping::new); } private <T extends AbstractUrlHandlerMapping> T createWelcomePageHandlerMapping(ApplicationContext applicationContext, FormattingConversionService mvcConversionService, ResourceUrlProvider mvcResourceUrlProvider, WelcomePageHandlerMappingFactory<T> factory) { TemplateAvailabilityProviders templateAvailabilityProviders = new TemplateAvailabilityProviders(applicationContext); String staticPathPattern = this.mvcProperties.getStaticPathPattern(); T handlerMapping = factory.create(templateAvailabilityProviders, applicationContext, this.getIndexHtmlResource(), staticPathPattern); handlerMapping.setInterceptors(this.getInterceptors(mvcConversionService, mvcResourceUrlProvider)); handlerMapping.setCorsConfigurations(this.getCorsConfigurations()); return handlerMapping; }意思就是说,要在静态资源的配置文件里面写index.html
让 Spring Boot 应用在访问根路径(如http://localhost:8080/)时能自动展示欢迎页(通常是index.html或模板引擎渲染的首页)也可以使用templates目录下存放index.html
而且templates只能通过controller跳转,而且需要模板引擎支持(需要导入jar包)
模板引擎
thymreleaf
使用演示
流程图

作用
后台封装一些数据,是动态的,写一些表达式——->把这个模板和这个数据交给我们模板引擎
解析并且移动到指定位置
(不同模板引擎,思想相同;只是语法有点区别)
使用
引入(通过网址)

导入pom.xml包中,自动会下载依赖
在index.html中写前端页面
先写controller
1
2
3
4
5
6
7
8
9
10
11
12
13
14
15import org.springframework.stereotype.Controller; import org.springframework.ui.Model; import org.springframework.web.bind.annotation.RequestMapping; //在templates目录下的所有页面,只能通过controller来跳转! //这个需要模板引擎的支持! thymeleaf @Controller public class IndexController { @RequestMapping("/test") public String test(Model model){ model.addAttribute("msg", "hello,springboot"); return "test"; } }通过”msg”传参”hello,springboot”
写html
1
2
3
4
5
6
7
8
9
10
11
12
13<!DOCTYPE html> <html lang="en" xmlns:th="http://www.thymeleaf.org"> <head> <meta charset="UTF-8"> <title>Title</title> </head> <body> <!--所有的html元素都可以被 thymeleaf替换接管; th:元素名--> <div th:text="${msg}"></div> </body> </html>如果只写
text="${msg}传不进去值
语法
Thymeleaf 官网:https://www.thymeleaf.org/ 直接在官网看帮助文档

基础语法:变量与表达式
Thymeleaf 通过 th: 前缀标识动态属性,最核心的是 ${...} 表达式(用于获取变量值)
输出变量(文本替换)
1
2
3
4
5
6<!-- 输出变量值到文本中 --> <p th:text="${user.name}">默认文本(未渲染时显示)</p> <!-- 输出到标签的属性中(如 value、href) --> <input type="text" th:value="${user.age}" /> <a th:href="${linkUrl}">链接</a>th:text:替换标签内的文本内容(会转义特殊字符,如<变为<)th:utext:不转义特殊字符(适合输出 HTML 片段,谨慎使用,防止 XSS)
表达式类型
表达式 作用 示例 ${...}变量表达式(获取模型中的数据) ${user.name}、${list.size()}*{...}选择变量表达式(简化对象属性访问) <div th:object="${user}"><span th:text="*{name}"></span></div>(等价于${user.name})#{...}消息表达式(国际化配置,读取 properties) #{user.title}(读取 i18n 配置文件中的user.title键值)@{...}链接表达式(处理 URL,自动拼接上下文路径) <a th:href="@{/user/detail(id=${userId})}">详情</a>(生成/项目上下文/user/detail?id=123)
条件判断
th:if和th:unless1
2
3
4
5<!-- 条件成立时显示标签 --> <p th:if="${user.age >= 18}">成年</p> <!-- 条件不成立时显示标签(与 th:if 相反) --> <p th:unless="${user.age >= 18}">未成年</p>- 判定规则:数值
0、null、false、空集合会被视为false,其他为true
- 判定规则:数值
th:switch+th:case1
2
3
4
5<div th:switch="${user.role}"> <p th:case="'ADMIN'">管理员</p> <p th:case="'USER'">普通用户</p> <p th:case="*">其他角色</p> <!-- * 表示默认值 --> </div>
循环遍历
用 th:each 遍历集合(列表、数组、Map 等):
- 遍历列表
1
2
3
4
<ul>
<!-- 遍历 users 集合,每次迭代的元素为 user -->
<li th:each="user : ${users}" th:text="${user.name}"></li>
</ul>- 获取迭代状态
遍历中可通过 状态变量 获取索引、是否为第一个 / 最后一个等信息:
1
2
3
4
5
6
7
8
9
10
<ul>
<!-- 状态变量格式:变量名 + Stat(如 userStat) -->
<li th:each="user, userStat : ${users}">
索引:<span th:text="${userStat.index}"></span> <!-- 从 0 开始 -->
序号:<span th:text="${userStat.count}"></span> <!-- 从 1 开始 -->
名称:<span th:text="${user.name}"></span>
<span th:if="${userStat.first}">(第一个)</span>
<span th:if="${userStat.last}">(最后一个)</span>
</li>
</ul>属性操作
动态设置属性
1
2
3
4
5
6
7
8<!-- 动态添加 class 属性 --> <div th:class="${isActive ? 'active' : 'inactive'}">状态</div> <!-- 多个 class 条件 --> <div th:classappend="${isError ? 'error' : ''}">提示</div> <!-- 追加 class --> <!-- 动态设置 style --> <p th:style="'color: ' + ${color} + '; font-size: 16px'">文本</p>布尔属性(如 checked、disabled)
1
2<!-- 条件为 true 时,添加 checked 属性 --> <input type="checkbox" th:checked="${isAgree}" />
片段复用(模板布局)
通过 th:fragment 定义可复用片段,再用 th:insert/th:replace 引入
- 定义片段(如在
footer.html中)
1
2
3
4
<!-- 定义名为 "footerFragment" 的片段 -->
<footer th:fragment="footerFragment">
<p>© 2024 我的网站</p>
</footer>- 引入片段(在其他页面中)
1
2
3
4
5
<!-- 引入片段:th:insert(保留自身标签,片段作为子元素) -->
<div th:insert="footer :: footerFragment"></div>
<!-- th:replace(用片段替换自身标签) -->
<div th:replace="footer :: footerFragment"></div> <!-- 最终渲染为 <footer>...</footer> -->footer是模板文件名(无需.html后缀),footerFragment是片段名。
内置对象
Thymeleaf 提供了许多内置对象,方便处理数据:
#strings:字符串工具(#strings.isEmpty(str)、#strings.toUpperCase(str)等)。#numbers:数字格式化(#numbers.formatDecimal(num, 2, 2)保留两位小数)。#dates:日期处理(#dates.format(date, 'yyyy-MM-dd'))。#lists:集合工具(#lists.size(list)、#lists.contains(list, obj)等)。1
2<p>大写名称:<span th:text="${#strings.toUpperCase(user.name)}"></span></p> <p>格式化日期:<span th:text="${#dates.format(user.birthday, 'yyyy年MM月dd日')}"></span></p>
注释
Thymeleaf 有两种注释:
标准 HTML 注释(会被浏览器解析,但 Thymeleaf 会忽略):
1
<!-- 这是普通 HTML 注释 -->Thymeleaf 专属注释(不会被浏览器解析,仅模板引擎可见):
1
<!--/* 这是 Thymeleaf 注释,渲染后不会显示 */-->
MVC配置原理(模板)
依旧先看官方文档
1
2
3
4
5
6
7
8
9
10
11
12
13
14
15
16
17
18
19
20
21
22
23
24
25
26
27
28
29
30
31
32
33
34
35
36
37
38
39Spring MVC Auto-configuration // Spring Boot为Spring MVC提供了自动配置,它可以很好地与大多数应用程序一起工作。 Spring Boot provides auto-configuration for Spring MVC that works well with most applications. // 自动配置在Spring默认设置的基础上添加了以下功能: The auto-configuration adds the following features on top of Spring’s defaults: // 包含视图解析器 Inclusion of ContentNegotiatingViewResolver and BeanNameViewResolver beans. // 支持静态资源文件夹的路径,以及webjars Support for serving static resources, including support for WebJars // 自动注册了Converter: // 转换器,这就是我们网页提交数据到后台自动封装成为对象的东西,比如把"1"字符串自动转换为int类型 // Formatter:【格式化器,比如页面给我们了一个2019-8-10,它会给我们自动格式化为Date对象】 Automatic registration of Converter, GenericConverter, and Formatter beans. // HttpMessageConverters // SpringMVC用来转换Http请求和响应的的,比如我们要把一个User对象转换为JSON字符串,可以去看官网文档解释; Support for HttpMessageConverters (covered later in this document). // 定义错误代码生成规则的 Automatic registration of MessageCodesResolver (covered later in this document). // 首页定制 Static index.html support. // 图标定制 Custom Favicon support (covered later in this document). // 初始化数据绑定器:帮我们把请求数据绑定到JavaBean中! Automatic use of a ConfigurableWebBindingInitializer bean (covered later in this document). /* 如果您希望保留Spring Boot MVC功能,并且希望添加其他MVC配置(拦截器、格式化程序、视图控制器和其他功能),则可以添加自己 的@configuration类,类型为webmvcconfiguer,但不添加@EnableWebMvc。如果希望提供 RequestMappingHandlerMapping、RequestMappingHandlerAdapter或ExceptionHandlerExceptionResolver的自定义 实例,则可以声明WebMVCregistrationAdapter实例来提供此类组件。 */ If you want to keep Spring Boot MVC features and you want to add additional MVC configuration (interceptors, formatters, view controllers, and other features), you can add your own @Configuration class of type WebMvcConfigurer but without @EnableWebMvc. If you wish to provide custom instances of RequestMappingHandlerMapping, RequestMappingHandlerAdapter, or ExceptionHandlerExceptionResolver, you can declare a WebMvcRegistrationsAdapter instance to provide such components. // 如果您想完全控制Spring MVC,可以添加自己的@Configuration,并用@EnableWebMvc进行注释。 If you want to take complete control of Spring MVC, you can add your own @Configuration annotated with @EnableWebMvc.根据文档所说
添加其他MVC配置==添加自己的@Configuration + WebMvcRegistrationsAdapter (接口) +
无@EnableWebMvc
自己装配一个视图解释器
1
2
3
4
5
6
7
8
9
10
11
12
13
14
15
16
17
18
19
20
21
22
23
24
25
26
27
28
29package com.kuang.config; import org.springframework.context.annotation.Bean; import org.springframework.context.annotation.Configuration; import org.springframework.web.servlet.View; import org.springframework.web.servlet.ViewResolver; import org.springframework.web.servlet.config.annotation.WebMvcConfigurer; import java.util.Locale; // 如果。你想diy一些定制化的功能,只要写这个组件,然后将它交给springboot,springboot就会帮我们自动装配! // 扩展 springmvc dispatchservlet @Configuration public class MyMvcConfig implements WebMvcConfigurer { // ViewResolver 实现了视图解析器接口的类,我们就可以把它看做视图解析器 @Bean public ViewResolver myViewResolver(){ return new MyViewResolver(); } // 自定义了一个自己的视图解析器MyViewResolver public static class MyViewResolver implements ViewResolver { @Override public View resolveViewName(String viewName, Locale locale) throws Exception { return null; } } }在config创建一个自己的MyMvcConfig
继承ViewResolver到自己的类,重写方法
将方法实例化,写@Bean待用
启动即可
全面接管:
SpringBoot对SpringMVC的自动配置不需要了,所有都是我们自己去配置!
只需在我们的配置类中要加一个@EnableWebMvc。(导入了一个类:DelegatingwebMvcconfiguration:从容器中获取所有的webmvcconfig)
我们看下如果我们全面接管了SpringMVC了,我们之前SpringBoot给我们配置的静态资源映射一定会无效
开发分层
从下到上:
- 数据库层(最底层,数据存储载体)
- 本质:实际存储数据的数据库(如 MySQL、Oracle、Redis 等),是所有数据操作的最终目标。
- 作用:接收上层指令,完成数据的物理存储、查询、修改,不包含业务逻辑。
- DAO 层(数据访问层,核心写 / 读数据层)
- 你已经了解的核心数据操作层,专门负责和数据库交互。
- 写数据相关操作:通过
save()(新增)、update()(修改)、delete()(删除)等方法,将业务层传递的数据写入数据库。 - 关键:只做数据读写,不处理业务规则(比如不能在 DAO 层判断 “用户是否有权限修改数据”)。
- Service 层(业务逻辑层,数据操作的 “决策者”)
- 作用:承接上层请求,处理核心业务逻辑,决定 “要不要写数据”“写什么数据”。
- 与数据的关系:不直接操作数据库,而是调用 DAO 层的方法来完成数据写入 / 读取。
- 示例:用户提交订单时,Service 层先判断库存是否充足,再调用
orderDao.save(order)写入订单数据,同时调用productDao.updateStock()修改库存数据。
- Controller 层(控制层,数据的 “接收者” 和 “返回者”)
- 作用:接收前端(如网页、APP)的请求(比如用户提交的表单数据),传递给 Service 层,再将处理结果(成功 / 失败、返回数据)返回给前端。
- 与数据的关系:只负责数据的接收和转发,不处理业务,也不直接操作数据库。
- 示例:接收前端传来的 “新增用户” 数据(姓名、年龄),封装成 User 对象传给
userService.saveUser(user),再告诉前端 “用户新增成功”。
- 前端层(视图层,用户交互层)
- 作用:用户直接操作的界面(如网页、APP 页面),负责展示数据和收集用户输入的数据。
- 与数据的关系:将用户输入的数据(如填写的注册信息)传递给 Controller 层,再展示从后端返回的数据(如查询到的用户列表)
项目开发
数据库层
伪造数据
Department1
2
3
4
5
6
7
8
9
10
11
12
13
14
15package com.example.demo.pojo; import lombok.AllArgsConstructor; import lombok.Data; import lombok.NoArgsConstructor; //部门表 @Data @AllArgsConstructor @NoArgsConstructor public class Department { private Integer id; private String departmentName; }导入lombok—–伪造数据——-导入注解
1
2
3@Data//数据 @AllArgsConstructor//有参 @NoArgsConstructor//无参(Lombok 是一个 Java 库,通过注解简化 Java 代码开发,减少模板代码(如 getter、setter、构造器等),提高开发效率)
Lombok用途:
- 消除模板代码
@Getter/@Setter:自动生成字段的 getter/setter 方法。@ToString:生成toString()方法,可通过exclude排除字段。@EqualsAndHashCode:生成equals()和hashCode()方法。@NoArgsConstructor/@AllArgsConstructor/@RequiredArgsConstructor:生成无参、全参、必填字段(final或@NonNull)的构造器。
- 简化对象创建
@Builder:提供建造者模式 API,方便链式调用创建对象(如User.builder().name("a").age(18).build())。
- 资源自动管理
@Cleanup:自动关闭实现Closeable的资源(如 IO 流),替代try-finally。
- 日志简化
@Slf4j(或@Log/@Log4j等):自动生成日志对象(如private static final Logger log = LoggerFactory.getLogger(xxx.class)),直接使用log.info(...)。
- 数据类简化
@Data:组合@Getter、@Setter、@ToString、@EqualsAndHashCode、@RequiredArgsConstructor,适合简单数据类。@Value:生成不可变类(字段默认为final,仅含 getter)
- 消除模板代码
写员工表
Employee1
2
3
4
5
6
7
8
9
10
11
12
13
14
15
16
17
18
19
20package com.example.demo.pojo; import lombok.AllArgsConstructor; import lombok.Data; import lombok.NoArgsConstructor; @Data @AllArgsConstructor @NoArgsConstructor //员工表 public class Employee { private Integer id; private String Lastname; private String Email; private Integer gender;//0: 女 1:男 private Department department; private Data birthday; }其中调用
@NoArgsConstructor + @AllArgsConstructor,框架可通过无参构造器创建对象,手动创建时可直接new User("张三",20),兼顾灵活性和便捷性
后面在写DAO层的时候,发现date不会自动实现,所以手动构造一下有参构造器
1
2
3
4
5
6
7
8
9
public Employee(Integer id, String lastname, String email, Integer gender,Department department) {
this.id = id;
Lastname = lastname;
Email = email;
this.department = department;
this.gender = gender;
//默认创建日期
this.birthday = new Date();
}记得加上date的类
DAO 层
写
DepartmentDao和EmployeeDao1
2
3
4
5
6
7
8
9
10
11
12
13
14
15
16
17
18
19
20
21
22
23
24
25
26
27
28
29
30
31
32
33package com.example.demo.dao; import com.example.demo.pojo.Department; import org.springframework.stereotype.Repository; import java.util.Collection; import java.util.HashMap; import java.util.Map; //部门Dao @Repository//使用spring托管 public class DepartmentDao { //模拟数据库中的数据 private static Map<Integer, Department> departments =null; static { departments=new HashMap<Integer, Department>();//创建一个部门表 departments.put(101,new Department(101,"教学部")); departments.put(102,new Department(102,"市场部")); departments.put(103,new Department(103,"校验部")); departments.put(104,new Department(104,"运营部")); departments.put(105,new Department(105,"后勤部")); } //获得所有部门信息 public Collection<Department> getDepartments(){ return departments.values(); } //通过id得到部门 public Department getDepartment(Integer id){ return departments.get(id); } }1
2
3
4
5
6
7
8
9
10
11
12
13
14
15
16
17
18
19
20
21
22
23
24
25
26
27
28
29
30
31
32
33
34
35package com.example.demo.dao; import com.example.demo.pojo.Department; import com.example.demo.pojo.Employee; import org.springframework.stereotype.Repository; import java.util.Collection; import java.util.HashMap; import java.util.Map; @Repository//使用spring托管 public class EmployeeDao { //模拟数据 private static Map<Integer, Employee> employees =null; //员工有所属部门,所以需要继承部门 private DepartmentDao departmentDao; static { employees =new HashMap<Integer, Employee>();//创建一个员工表 employees.put(101,new Department(101,"教学部")); employees.put(102,new Department(102,"市场部")); employees.put(103,new Department(103,"校验部")); employees.put(104,new Department(104,"运营部")); employees.put(105,new Department(105,"后勤部")); } //获得所有部门信息 public Collection<Department> getDepartments(){ return employees.values(); } //通过id得到部门 public Department getDepartment(Integer id){ return employees.get(id); } }@Repository标记该类为 Spring 管理的 “数据访问组件”,Spring 会自动扫描并将其实例化存入 IoC 容器,后续可通过@Autowired注入使用在部员层写增删改查
1
2
3
4
5
6
7
8
9
10
11
12
13//主键自增 private static Integer initId = 1006;//从1006开始自增 //增加员工 private void save(Employee employee){ if (employee.getId()==null){ employee.setId(initId++);//序号++ } employee.setDepartment(departmentDao.getDepartment(employee.getDepartment().getId()));//给部员绑定完整的部门信息 //建立一个部门从departmentDao得到id,而id是从employee的部门编号获得的 employees.put(employee.getId(),employee);//将数据放进去 }1
2
3
4//查询员工信息 public Collection<Employee> getAll(){ return employees.values(); }Collection是 Java 集合框架的顶层接口,List、Set等都实现了它1
<Employee>需要的是所有员工对象,不需要id,所以没写返回
Collection<Employee>(接口)而不是具体实现类(比如ArrayList<Employee>)后续如果需要修改存储结构(比如把Map换成List存储员工)getAll()方法的返回类型不用变,调用方的代码也不用改(面向接口编程)1
2
3
4//通过id查询员工 public Employee getEmployeeById(Integer id){ return employees.get(id); }1
2
3
4//通过id删除员工 public void delete(Integer id){ employees.remove(id); }
首页
在自定义mvc中加入视图模板,同于直接访问跳转index.html
1
2
3
4
5
6
7
8
9@Configuration public class MyMvcConfig implements WebMvcConfigurer { @Override public void addViewControllers(ViewControllerRegistry registry) { // 注册视图控制器:将请求路径映射到视图名 registry.addViewController("/").setViewName("index");//访问xxxx就跳转到---index registry.addViewController("/index.html").setViewName("index"); } }使用thymeleaf,修改index.html为模板可支持的代码
可以看上面的解释
还要关闭模板引擎的缓存(在配置文件里面)
1
spring.thymeleaf.cache = false;
国际化
页面的中英文转化
编写
必须在UTF-8下
新建目录
i18n就是国际化单词缩写ixxxn(xxx有18个)
在里面写两个空文件
login.propertieslogin_zh_CN.properties
直接右键new即可添加文件

可以使用进行
Resource Bundle可视化配置(新版idea需要下载插件)
根据首页内容进行配置即可
国际化识别
通过MessageSourceAutoConfiguration类
在配置文件配置
1
spring.messages.basename=i18n.login国际化表达形式(在模板中)
#{}
国际化消息转换

登录实现

在index.html中修改,登录之后的跳转地址(点击提交按钮,直接跳转请求)
跳转在controller里面写
1
2
3
4
5
6
7
8
9
10
11
12
13
14
15
16package com.example.demo.controller; import org.springframework.stereotype.Controller; import org.springframework.web.bind.annotation.RequestMapping; import org.springframework.web.bind.annotation.ResponseBody; @Controller public class LoginController { @RequestMapping("user/login") @ResponseBody public String login(){ return "ok"; } } //测试登录之后能不能到这个请求注释解释:
@Controller:标识该类为 Spring MVC 的控制器,用于处理 HTTP 请求。@RequestMapping("user/login"):映射 HTTP 请求路径,当客户端访问/user/login路径时,会触发login()方法。@ResponseBody:表示该方法的返回值会直接作为 HTTP 响应体返回(而非视图名称),这里会返回字符串 “ok”。
接受usename password
1
2
3public String login(@RequestParam("username") String username, @RequestParam("password") String password){ return "ok"; }回显数据
1
2
3public String login(@RequestParam("username") String username, @RequestParam("password") String password, Model model){ return "ok"; }具体业务
1
2
3
4
5
6
7
8//具体业务 if(!StringUtils.isEmpty(username)&&"123456".equals(password)){//账号不为空,密码是123456 return "dashboard//登陆的成功页面 }else { //告诉用户你登陆失败了 model.addAttribute("msg","用户名或者密码错误");//msg 只是一个自定义的属性名(key) return "index";//登录页面 }登录错误,但是没有回显(错误提示),还是保持在index
添加错误提示 在index

1
2<!--如果msg的值为空,则不显示消息,|--> <p style="color: red" th:text="${msg}" th:if="${not #strings.isEmpty(msg)}"></p>这个时候用上了上面的msg
后面条件,如果msg不等于空,就显示代码(登录成功msg就不赋值,是空)
登录成功之后的url
 、
、直接使用映射功能
在MyMvcConfig里面添加
1
2
3
4
5
6
7
8//具体业务 if(!StringUtils.isEmpty(username)&&"123456".equals(password)){ return "redirect:/main.html";//直接重印到main.html }else { //告诉用户你登陆失败了 model.addAttribute("msg","用户名或者密码错误"); return "index"; }return “redirect:/main.html”;//直接重印到main.html
在MyMvcConfig里面添加

结果

同时就衍生出一个问题
不需要登录,直接写/main.html即可访问
所以需要登录拦截器
登录拦截器
写Interceptor
1
2
3
4
5
6
7
8
9
10
11
12
13package com.example.demo.config; import jakarta.servlet.http.HttpServletRequest; import jakarta.servlet.http.HttpServletResponse; import org.springframework.web.servlet.HandlerInterceptor; import org.springframework.web.servlet.ModelAndView; public class LoginHandlerInterceptor implements HandlerInterceptor { @Override public boolean preHandle(HttpServletRequest request, HttpServletResponse response, Object handler) throws Exception { return false; }是否放行
如果登录成功就要获取session
所以先从具体业务中生成session

先加入session,再代码执行中生成session(就叫username)(此处的LoginUser和拦截器的检验名称相同)
编写拦截器
1
2
3
4
5
6
7
8
9public boolean preHandle(HttpServletRequest request, HttpServletResponse response, Object handler) throws Exception { request.getSession().setAttribute("loginUser"); if ("loginUser"== null) {//没登录 request.setAttribute("mag","没有权限登录"); request.getRequestDispatcher("/index.html").forward(request,response); return false; }else { return true; }如果没登录,就是没有session,loginUser(接上面文件的命名)就是空
跳转到index,不放行
否则就是,放行
配置拦截器(MyMvcConfig)
1
2
3
4@Override public void addInterceptors(InterceptorRegistry registry) { registry.addInterceptor(new LoginHandlerInterceptor()).addPathPatterns("/**").excludePathPatterns("/index","/","/user/login"); }addPathPatterns(“/**”)排除所有请求
excludePathPatterns(“/index”,”/“,”/user/login”)不排除这些请求

原因:
就是没有排除静态资源
1
2
3
4@Override public void addInterceptors(InterceptorRegistry registry) { registry.addInterceptor(new LoginHandlerInterceptor()).addPathPatterns("/**").excludePathPatterns("/index","/","/user/login","css/*","js/**","img/**"); }//比如有css,js,img成功之后再登录页面(dashboard.html)可以修改自己的用户名

因为刚刚的session的值loginuser就等于username,所以直接将这个用目的名称回显修改为上述即可
展示员工列表
在EmployController编写代码
用于接收请求

修改在 成功登录页面(dashboard.html)的接收路径

而且还要和list.html同步绑定,接收路径(以用于在接收list之后映射到页面)
编辑侧边栏
在dashboard文件内,将侧边栏单另出来(相当于将
侧边栏变成组件)
在list文件进行调用

这样进入页面之后,两个页面的侧边栏名称相同,都变成
员工管理接下来修改头部(上导航栏)(就是那个进入的第一个栏)
同上
由于两者都变成了组件
侧边栏头部所以需要在templates目录写conmmons目录下commons.html用于写自己所写的组件
直接将刚刚两个html中的输入剪切到commons.html

但是要让dashboard.html list.html存在跳转到commons.html

使用括号传参,选择跳转页面进行高亮字体(就是点哪里,哪里亮)

前端显示动态传参数据

在前端页面配置
调用employeedao的方法,进行删除和编辑,同时添加按钮
增加员工
先写按钮—-点击后跳转—添加成功—返回首页
编写按钮样式,修改颜色;配置点击后的跳转路径

编写跳转配置文件

通过按钮,以get方式跳转到EmployeeController
然后再EmployeeController再跳转
因为浏览器的按钮只能发起请求(request),而 Spring 的 Controller 负责接收请求 → 处理业务 → 再返回页面或数据。
所以你必须在 Controller 里写一个方法,告诉框架:“当访问这个路径时,应该跳转到哪个页面”步骤 行为 说明 ① 用户点击按钮 浏览器访问 URL /emp② Spring Boot 收到请求 /emp找到 Controller 中对应的 @GetMapping("/emp")方法③ Controller 方法执行并返回 "emps/add"告诉 Spring 去渲染 templates/emps/add.html④ 浏览器显示添加页面 用户看到“添加员工”表单页面 EmployeeController拟写跳转的方法
1
2
3
4@GetMapping("/emp") public String toAddpage(){ return "emps/add"; }添加add.html(内容和list.html相同)
只需要改此处

使用bootstrap工具,修改表单
将Employee中的变量一一对应即可
运行之后就会跳转到表单页面
但是发现部门匹配的是编号(12345)

所以需要再controller中查询信息
1
2
3
4
5
6@GetMapping("/emp") public String toAddpage(Model model){ Collection<Department> departments=departmentDao.getDepartments(); model.addAttribute("departments,departments"); return "emps/add";查询departmentDao中的getDepartments
前端添加相关的跳转属性

选择部门之后转化为对应的数字,用于员工表

在此处写一个跳转(/emp)
注意:此处的emp和上面的不一样
因为上面的是get提交(只是获得跳转),此处是表单post提交
1
2
3
4@PostMapping("/emp") public String addemp(){ return "redirect:/emps";//“redirect:/emps” 是后端常见的页面重定向指令,核心作用是把请求转发到 “/emps” 对应的资源 }为了添加成功,刷新表单
提交信息时填写生日
xxx/sss/mmm正常
xxx-sss-mmm报错

原因:
源码中视图解析器(WebMvcAutoConfiguration)

如果要变成xxx-sss-mmm
就要在配置文件中修改
1
spring.mnv.data-format=xxx-sss-mmm
修改员工
存在编辑中
先修改点击按钮的跳转路劲

写跳转代码到update文件中(同上复制add)
1
2
3
4//跳转到员工修改界面 public String toupdateEMP(){ return "emps/update"; }需要查出原有数据(需要和刚刚的页面进行交互)
1
2
3
4
5
6
7/跳转到员工修改界面 public String toupdateEMP(@PathVariable("id") Integer id,Model model){ //查出原来的数据 Employee employee = employeeDao.getEmployeeById(id); model.addAttribute("emp",employee); return "emps/update"; }修改undate前端的接收(接收未修改的lastname,email….到编辑界面)

点击修改,将信息返回到表单
写跳转代码
1
2
3
4
5@PostMapping("/updateEMP") public String updateEMP(Employee employee){ employeeDao.save(employee); return "redirect:/emps"; }前端

上面的post提交是在/updateEMP
这样不会修改,而是增加了成员名单
因为每次修改都会改变id值
携带上隐藏id即可

删除员工
前端接收点击请求

后端
1
2
3
4
5
6//删除员工 @GetMapping("/delemp/{id}") public String deleteEmp(@PathVariable("id")int id){ employeeDao.delete(id); return "redirect:/emps"; }
报错问题
404 500…….

模板文件夹下,添加error文件夹,直接在里面搞一个404.html即可
报错会自动找到这里
整合JDBC使用
DBC(Java Database Connectivity)是 Java 语言中用于连接和操作数据库的标准 API(应用程序编程接口)。它提供了一套统一的规范,让 Java 程序能够通过标准的方法访问各种关系型数据库(如 MySQL、Oracle、SQL Server 等),而无需关注底层数据库的具体实现细节
创建项目

配置yaml,使用代码输出查看默认
1
2
3
4
5
6spring: datasource: username: password: url: jdbc:mysql://localhost:3306/mybatis?useUnicode=true&characterEncoding=utf-8 driver-class-name: com.mysql.cj.jdbc.Driver输出默认数据源
1
2
3
4
5
6
7
8
9@SpringBootTest class JdbcApplicationTests { @Autowired DataSource dataSource; @Test void contextLoads() { System.out.println(dataSource.getClass()); }
输出数据源为class com.zaxxer.hikari.HikariDataSource
连接之前,需要启动数据库服务
我用的是phpstudy,创建库,导入数据即可
数据库连接
1
2
3
4
5
6
7
8@Test void contextLoads() { System.out.println(dataSource.getClass()); //建立数据库连接 Connection connection = dataSource.getConnection(); System.out.println(connection); //关闭 connection.close();发现没有配置时区

配置

跑一下即可
查询数据库中的所有信息(直接将方法分装到MAP里面,相当于bean)
1
2
3
4
5
6
7
8//查询数据库中的所有信息 //没有实体类,数据库中的东西,怎么获取?----MAP @GetMapping("/userList") public List<Map<String, Object>> userList() { String sql = "select * from user"; List<Map<String, Object>> list_maps = jdbcTemplate.queryForList(sql); return list_maps; }
和数据库匹配
写增删改查

增加成功
1
2
3
4
5
6
7
8
9
10
11
12
13
14
15
16
17
18
19
20
21
22
23
24
25//增加 @GetMapping("/addUser") public String addUser() { String sql = "insert into localhost.user (id,username,password,email,) values(4,'huazi','1346')"; jdbcTemplate.update(sql); return "success"; } //更新 @GetMapping("/updateUser/{id}") public String updateUser(@PathVariable ("id")int id) { String sql ="update localhost.user set username=?,password? where id=?"+id; //封装 Object[] objects = new Object[2]; objects[0] = "huazi"; objects[1] = "sdf"; jdbcTemplate.update(sql, objects); return "ok"; } //删除 @GetMapping("/deleteUser/{id}") public String updateUser(@PathVariable ("id")int id) { String sql ="delete from localhost.user where id=?"; jdbcTemplate.update(sql, id); return "ok!!!"; }
整合Druid数据源
Java程序很大一部分要操作数据库,为了提高性能操作数据库的时候,又不得不使用数据库连接池。
Druid 是阿里巴巴开源平台上一个数据库连接池实现,结合了 C3P0、DBCP 等 DB 池的优点,同时加入了日志监控。
Druid 可以很好的监控 DB 池连接和 SQL 的执行情况,天生就是针对监控而生的 DB 连接池
配置数据源
添加上 Druid 数据源依赖
1
2
3
4
5
6<!-- https://mvnrepository.com/artifact/com.alibaba/druid --> <dependency> <groupId>com.alibaba</groupId> <artifactId>druid</artifactId> <version>1.2.27</version> </dependency>
成功导入
配置数据源
在yaml文件配置

配其他东西
1
2
3
4
5
6
7
8
9
10
11
12
13
14
15
16
17
18
19
20
21#Spring Boot 默认是不注入这些属性值的,需要自己绑定 #druid 数据源专有配置 initialSize: 5 minIdle: 5 maxActive: 20 maxWait: 60000 timeBetweenEvictionRunsMillis: 60000 minEvictableIdleTimeMillis: 300000 validationQuery: SELECT 1 FROM DUAL testWhileIdle: true testOnBorrow: false testOnReturn: false poolPreparedStatements: true #配置监控统计拦截的filters,stat:监控统计、log4j:日志记录、wall:防御sql注入 #如果允许时报错 java.lang.ClassNotFoundException: org.apache.log4j.Priority #则导入 log4j 依赖即可, Maven 地址: https://mvnrepository.com/artifact/log4j/log4j filters: stat,wall,log4j maxPoolPreparedStatementPerConnectionSize: 20 useGlobalDataSourceStat: true connectionProperties: druid.stat.mergeSql=true;druid.stat.slowSqlMillis=500log4j记得导入maven
将数据库文件和配置文件绑定
写一个DruidConfig文件

将自定义的容器datasources bean到容器中,不需要springboot创建
配置DruidConfig
Druid 是阿里巴巴开源的一个数据库连接池(DataSource),
它自带一个 web 监控界面,可以查看:
- 当前数据库连接池的运行状态(活跃连接数、SQL 执行慢查询等)
- SQL 执行统计
- Web 应用性能监控等。
这个后台监控页面的访问路径通常是:
1
http://localhost:8080/druid但要让这个后台界面能访问,你得先在配置里注册一个 Servlet(负责处理 /druid/* 的请求)。
后台监控
1
2
3
4
5
6
7
8
9
10
11
12
13
14
15
16
17
18
19
20
21
22
23//后台检测 @Bean //不写注解,进不到ServletRegistrationBean public ServletRegistrationBean servletRegistrationBean() { ServletRegistrationBean<StatViewServlet> bean = new ServletRegistrationBean<>(new StatViewServlet(), "/druid/*"); //后台需要有人登录,账号密码配置 HashMap<String, String> initParams = new HashMap<>(); //添加配置 initParams.put("loginUsername", "admin");//登录的key是固定的 initParams.put("loginPassword", "123456"); //允许谁可以访问 initParams.put("allow", "");//写谁就是谁可以访问 //禁止谁可以访问 initParams.put("running", "192.168.11.123");//设置谁(前面的引号),设置他的ip(后面的引号) bean.setInitParameters(initParams);//设置初始化参数 return bean; } }
跑一下,发现成功
重申:
后台监控应该是web.xml用的事情
但是由于springboot内置了 servlet容器,所以没有web,xml,代替方法就是ServletRegistrationBean
部分 作用 @Bean注册这个配置到 Spring 容器 ServletRegistrationBean注册 Druid 的后台监控 Servlet new StatViewServlet()Druid 内置的统计与监控 Servlet "/druid/*"访问路径映射 loginUsername/loginPassword登录后台的账号密码 allowIP 白名单(为空表示不限制) 设置过滤器
1
2
3
4
5
6
7
8
9
10
11
12
13//设置filter @Bean public FilterRegistrationBean WebStartFilter() { FilterRegistrationBean bean = new FilterRegistrationBean(); bean.setFilter(new WebStatFilter()); //可以过滤的请求 Map<String, String> initParams = new HashMap<>(); initParams.put("exclusions", "*.js,*.css,/druid/*");//白名单 bean.setInitParameters(initParams);//设置初始化参数 return bean; }
Mybatis框架
整合
创建项目,导入依赖
由于Mybatis不是官方的,所以需要自己导入
1
2
3
4
5<dependency> <groupId>org.mybatis.spring.boot</groupId> <artifactId>mybatis-spring-boot</artifactId> <version>2.2.2</version> </dependency>然后配置数据库
和上面一样
1
2
3
4
5
6spring: datasource: password: 123456 username: localhost url: jdbc:mysql://localhost:3306/localhost?serverTimezone=UTC&useUnicode=true&characterEncoding=utf-8 driver-class-name: com.mysql.jdbc.Driver导入lombok更加方便(通过注解简化 POJO 类代码)
配置
- 先写一个user类
1
2
3
4
5
6
7
8
9
10
11
12
13
14
package com.example.mybatis.pojo;
import lombok.AllArgsConstructor;
import lombok.Data;
import lombok.NoArgsConstructor;
@Data
@NoArgsConstructor
@AllArgsConstructor
public class User {
private Integer id;
private String name;
private String password;
}再写一个mapper
UserMapper用来写增删改查
1
2
3
4
5
6
7
8
9
10
11
12
13
14package com.example.mybatis.mapper; import com.example.mybatis.pojo.User; import org.apache.ibatis.annotations.Mapper; import org.springframework.stereotype.Repository; import java.util.List; //这和注解表明,这是一个mybatis的mapper类: Dao层 @Mapper @Repository public interface UserMapper { }创建文件用于mapper的映射

配置映射文件
1
2
3
4
5
6
7
8
9
10
11
12
13
14
15
16
17
18
19
20
21
22
23
24
25
26
27<?xml version="1.0" encoding="UTF-8" ?> <!DOCTYPE mapper PUBLIC "-//mybatis.org//DTD Mapper 3.0//EN" "http://mybatis.org/dtd/mybatis-3-mapper.dtd"> <mapper namespace="com.emample.mybatis.mapper.UserMapper"> <select id="queryUserList" resultType="User"> select * from department; </select> <select id="queryUserList" resultType="User" > select * from department where id = #{id}; </select> <select id="addUser" parameterType="User" > insert into user (id,username,password) values (#{id},#{username},#{password}) </select> <select id="updateUser" parameterType="User" > update user set username=#{username},password#{password} where id=#{id} </select> <select id="deleteUser" parameterType="int" > delete from user wher id = #{id} </select> </mapper>在配置文件整合mybatis

增删改查
1
2
3
4
5
6
7
8
9
10
11
12
13
14
15
16
17
18
19
20
21
22
23
24
25
26
27
28
29
30
31
32
33
34
35
36
37
38
39
40
41
42
43
44
45
46
47
48
49
50
51package com.example.jdbc.controller; import org.springframework.beans.factory.annotation.Autowired; import org.springframework.jdbc.core.JdbcTemplate; import org.springframework.web.bind.annotation.GetMapping; import org.springframework.web.bind.annotation.PathVariable; import org.springframework.web.bind.annotation.RestController; import java.util.List; import java.util.Map; import java.util.Objects; @RestController public class JDBCcontroller { @Autowired JdbcTemplate jdbcTemplate; //查询数据库中的所有信息 //没有实体类,数据库中的东西,怎么获取?----MAP @GetMapping("/userList") public List<Map<String, Object>> userList() { String sql = "select * from user"; List<Map<String, Object>> list_maps = jdbcTemplate.queryForList(sql); return list_maps; } //增加 @GetMapping("/addUser") public String addUser() { String sql = "insert into localhost.user (id,username,password,email,) values(4,'huazi','1346')"; jdbcTemplate.update(sql); return "success"; } //更新 @GetMapping("/updateUser/{id}") public String updateUser(@PathVariable ("id") int id) { String sql ="update localhost.user set username=?,password? where id=?"+id; //封装 Object[] objects = new Object[2]; objects[0] = "huazi"; objects[1] = "sdf"; jdbcTemplate.update(sql, objects); return "ok"; } //删除 @GetMapping("/deleteUser/{id}") public String deleteUser(@PathVariable ("id")int id) { String sql ="delete from localhost.user where id=?"; jdbcTemplate.update(sql, id); return "ok!!!"; } }